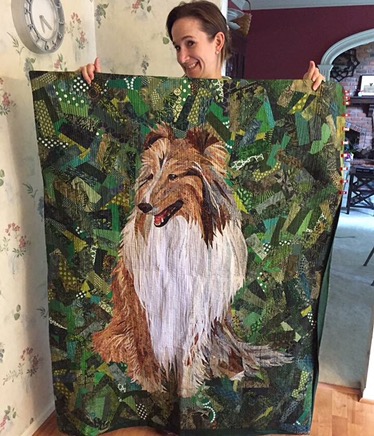
Linus the WonderCollie, at long last

This is Cedarwoods Steamboat Linus, the dog to whom all other Poplin dogs will forever be compared. February 27, 2001 – June 25, 2013.

He was a great dog with a hilarious personality. He was named Linus because of his affinity for blankets, even as a small puppy. Fitting name (and habit) for the dog of a quilter, no?

The above photo was taken in our back yard in the summer of 2005. Soon after, I took it to Allied Photocopy, my favorite local printer, and asked them to blow it up for me in black and white on their large-format printer. It didn’t matter to me if the resolution was good, since I was planning to use the big photo just to trace the outline. A whole lot. Apparently. But I digress. 

So I came home with this gigantic picture, and used the dining room windows to trace out the image into sections of similar colors, numbering every…. single…. one…. of them.

I think there are over 400 sections of fabric carefully numbered in this. I have two copies of this tracing — one with sharpie, shown above, and one done on freezer paper with a Micron pen with registration marks so that I could cut out the pieces of fabric and attach them perfectly to their neighbors.

My plan was to cut individual pieces of fabric in a gazillion colors and needle-turn applique them to a background piece of fabric. The problem with this idea? I don’t applique. It’s not my thing. At the time, I didn’t even really know how.

I started on the project in 2006, and quickly stopped when I realized I’d be 400 years old before I finished. Not planning to live until I’m 400, I tossed out that effort.

Take Two, in late 2006: I thought, I KNOW! Fusible applique! So I started again, tracing a section onto fusible web backing paper and trying a few sections of fabric that way. Again, when I realized just how much fusible web that would take, how rigid and difficult to quilt the finished piece would be because of the adding and subtracting of layers and layers and layers… and acknowledging that I don’t have a table-sized lightbox for placing all of those little parts, I gave up again. I tossed that effort too.

In 2011, I tried again. I went to a retreat weekend and chose an out-of-the-way spot in the corner and spread Linus out on the floor. I traced him again–now the fourth time–onto plain white Kona cotton (I have a roll of PFD white that I originally bought for dye work). With the photo nearby, I selected fabrics from my stash of batik charms and started trying to put him together. I crawled around on that floor all weekend.

By the end of the weekend, I knew this wasn’t going to end up the way I wanted. What I could see in my head very definitely wasn’t coming through in fabric, so once again I abandoned ship. I kept this attempt until after the fire, when it was returned to me in a tangled mess after cleaning and restoration. So I threw it away, too.

By this point, Linus was 10 years old and really slowing down (which is saying something, since speed was never his gift anyway). I was worried that the quilt would become a memorial instead of a celebration, so I just let it backburner. Linus died after a stroke in 2013, and I didn’t want to work on the quilt for a while. It was always on my list of quilts I wanted to do, but just seemed unreachable: the proper tribute wasn’t in my skillset yet.

And then… AND THEN! I took the Making Faces with Melissa [Averinos] class in April of this year that I wrote about recently. And suddenly I knew how to make the tribute quilt for Linus. I abandoned the Technicolor Linus idea, deciding instead that I’d go for a more literal representation. And because of what I’d learned while doing the face quilts, I’d do the background first.

I pulled hundreds of green batik charm squares and added some modern and traditional greens to the mix. Because I knew that the whitest part of Linus’s collar had to be REALLY white, I knew that batik fabrics weren’t going to be quite right for that. But I needed the batiks for the shading of everything else. So having a variety of fabrics in the background meant that I could have a variety of fabrics in the dog as well, and it wouldn’t look weird. Alone, I’ll admit that the background looked kind of weird with the mixture of fabric types. But because I wanted the focus to be absolutely on Linus, I didn’t want the background to add too much texture or dimension.

After roughly tracing Linus (tracing number five now… ::sigh::) onto another big piece of white Kona cotton, I layered the trapezoidal green fabrics on the white to surround him. I just used a dab of Elmer’s Glue Stick — the kind you buy in the school supplies section at the grocery store — to secure the center of each piece of green up there. That way they could be pulled off and repositioned easily if I didn’t like a placement.

This took a while. And I kept having to cut up more green. I started with a small amount because I wasn’t stupid — after failing three previous times I wasn’t going to commit to cutting up all of my fabric this time either. I wanted to see if it was going to go well before I made that much of a sacrifice.

At this point, I was getting obsessed because I could see that the idea was definitely going to work. So I cut up ALL of my green batiks and a 4.5″ strip of all of my modern greens. As I neared the end of covering the background I had to break into the blue-greens to have enough, but I managed to avoid shopping for more greens. There’s probably about 5-6 yards of green fabric up there for the background.

At this point I was procrastinating, because it was Go Time. I needed to start working on building Linus himself, but after 10 years and 3 previous failures, I’ll admit to being intimidated. So I grabbed some odd scraps of light fabric on my cutting table and traced parts of Linus AGAIN (yeesh) so that the distinct outline of him would again be visible on the background. Using my pencil tracing underneath the green as a guide, I glued up this sixth (!!!) tracing to give Linus fuzzy edges for me to follow as I layered his hair.

I put the big photo on the wall next to the fabric piece so that I could constantly compare the two, and make sure I was being true to the photo. I also made the color photo the lock-screen on my phone so that I could see the color version as well.

Then I chopped up more batik scraps into slivers and chunks and started building. I decided to start as his feet and build up, for two reasons: first, because the layering of the hair would make more sense that way. Second, my theory was that I’d have more confidence as I neared his face. Theoretically.

So I started with his tail. The dark gray section was to help me keep track of where that leg would end up being, though that dark gray wasn’t necessarily going to stay there.

Jerry came in: “The tip of his tail wasn’t gray, it was white.” Yes, dear, I know that. But it was in the picture. Here, look at the picture.

See? Gray. I’m being true to the picture. It’ll look right in the end. Trust me.

The tail and feet took several nights. This was the third night, when Ella decided that I had made a soft nest for her, and she really didn’t care if I needed those shreds of fabric.

The next night I cut more pieces of fabric and prepped my “paintbox,” since I was running out of browns and beiges. And opened my third glue stick. Everything was still up there with small dabs of glue so it could easily be repositioned. Jerry said, “I hope it doesn’t get too humid in there since all those pieces would fall off the wall.”

NOT FUNNY, JERRY.

Progress was steady. I’d post nightly on Facebook and Instagram and people kept cheering me on, which was awesome.

His feet were really hard to get right. I finally gave up and decided to deal with them later, and started moving up his body instead.

Trying to get the right shadows of light and dark on his collar was a huge lesson in value and hue for me — lots of color play involved. Batiks can be used on either side with very little difference and they don’t fray because of the tight weave and the wax resist, which made them perfect for this technique (especially with all of the repositioning, the fabrics really got manhandled). With the prints, sometimes I used the right side and sometimes I used the wrong side, depending on what worked best in a particular location. Layering thin white fabrics on top of darker fabrics gave me even more color options to consider, which was a thrill, too. I learned a LOT.

I kept running out of colors — browns, tans, whites, grays… and I kept having to go back to my stash and raid it for more, cutting the pieces into shards with my rotary cutter so that they’d be easier to use and require less scissor work. Even so, I developed a callus on the knuckle of my right index finger from the scissors.

And then… Gulp… it was time to work on his face. I had traced the locations of his eyes, the gray and white blaze on his forehead, and his nose. I placed all of those.

Then I started filling in around them.

Jerry came in and took this picture as I worked on his face, which I love. I think I had just fixed his eye to be the correct size (it’s too large in the above photo and correct in the one two down from here). The process photo really shows how I was working and just how large the piece really is — I think I was on glue stick #4 by this point.

Once he looked like himself, I started putting the original photo next to a photo of the fabric collage in one of my phone apps so that I could compare them more easily.

Close, but his legs are still weird and his face is Sheltie-like. I ripped Linus’s face off about 4 times and his feet even more than that.

And the photo below is what our entire house looked like for the month I was working on this quilt. There were little shards of fabric EVERYwhere. They’d get tracked everywhere by me, the cats, the dog, the kids. We’re still finding them. When I needed a small piece of fabric as I was working, I’d hunt for it on the floor first — these were usually pieces that already had some glue on them so I didn’t want to put them back in the box with the still-clean pieces.

More work on the eye, getting the expression right and getting the shading around it better. But still a Sheltie face.

See? Compare Linus’s nose on the left with the little nose on the right. It’s… wrong. It’s not too short, really, but the proportions were wrong.

After working on this quilt and watching Linus go from being a Sheltie to being a Collie, I now know definitively what the structural difference is in a Collie’s nose vs. that of a Sheltie. It’s not the length of the nose, at least not in proportion to the head. It’s the height of the nose/jaws.

When I lowered his mouth a full inch (!!) and filled in with more brown, he suddenly looked like a Collie. I lowered his bottom jaw so he’d be smiling like Linus was in the picture. Subtle difference that totally changed the breed identity. Those of you who don’t know Collies and Shelties well won’t really see the difference, but anyone who does? I’m sure you’re nodding right now.

But his feet were still flummoxing me. I ripped them off and moved them back and forth several times, but they still looked wrong. So I finally resorted to technology. I took the original photograph and made it transparent, and overlaid it on top of a photo of the quilt.

The face? PERFECT. The bottom lip is 1/4″ to the right of where it should be, but I decided I can live with that. Linus’s mouth isn’t getting ripped off again.

And the overlay helped me see what was wrong with his feet. They were MUCH too narrow. The spacing was good, but because they were so narrow I couldn’t get the spread to look right — he had chicken feet. So I ripped off the bottom section of him again (poor dog) and moved everything around, adding and subtracting more fabrics. Rather than glue it again before I was SURE, I just stabbed pins into the design wall and decided to come back the next night to make a decision before gluing it all down.

Yes! Got it! The legs looked good, FINALLY. And I decided that because blades of grass obscure some of his feet in the original photo, I’d pull up some of the green background fabrics to do the same. That would resolve any lingering issues I had with the feet.

GOT IT.

At this point, a few people asked to see the whole process all in one picture so I posted this on Facebook and Instagram. And got about 100 new followers in a 24-hour period. For l’il ol’ me, that’s a lot. Every time I posted a progress shot of this quilt I’d get a burst of new people, which was definitely interesting to witness. I’ve been on social media for a while, but the biggest surge in activity for me has definitely been in the past six months.

I used a fine-tip applicator and Elmer’s Washable School Glue to carefully glue down every single edge of every single piece of fabric in the collage. This took two nights of work. Because of the challenges quilting the faces and how I had to stop frequently to push little shards of fabric back under the needle, I decided to borrow an idea from Susan Carlson and layer some tulle (fine netting) over the top of everything. This gave me a flat surface to quilt and an added layer of security for the raw edges. I bought gold, taupe, dark brown, and black tulle since it was only $1.29/yard. Gold was fine on Linus but showed too much on the green. Taupe made everything flat. Black looked awesome on the green but dulled Linus. Dark brown was fantastic, though it did darken the white fabrics a bit.

Mom offered up her table for pin-basting, since crawling around on the floor to pin-baste this one would likely have damaged him too much. Yes, the dark brown tulle is covering the entire quilt in the photo below. Hard to see, no?

I pinned excessively — about every 1.5″ — since I knew that the process of quilting this one would make some of the glue pop loose as the quilt was moved back and forth under the needle. My paranoia proved to be correct, and I was very glad to have so many pins.

You can see the tulle a bit better in this photo but it’s still hard to see unless you know it’s there.

And then the quilting. I used 100-weight Invisafil thread by Wonderfil Specialty Threads in Color #718 for the quilting. It was perfect — the coldness of the gray brightened the whites in the collar that the dark brown tulle had dulled, but the quilting almost disappeared.

I did organic free-motion straight line quilting with my HandiQuilter16, with no stitch regulator. Back and forth, back and forth….

Because the glue was starting to pop on Linus’s hair, I knew that I couldn’t fold or roll the quilt while it was in the process of being quilted. But because it was the last week of the school year, I had to go to bed at a reasonable hour. So each night I draped it over my ironing table so that it would not have any folding stress between work sessions. Ella was mad that she couldn’t cuddle-test the quilt, as is her custom when I stop for the night.

I just loved watching the texture come alive as the quilting got finished and every piece was secured in place. I did have to reach through the tulle a few times with a stylus or the tip of a seam ripper to flip tiny pieces of fabric over or shift things around, but most of the time things stayed where they were supposed to.

With only about 4″ of Linus’s haunches left to go (and about 16″x55″ of background remaining, I ran out of thread. At 3pm on Saturday of Memorial Day weekend. ARGH. So I spread the quilt out and Ella arrived INSTANTLY.

Look at the sweet boy!

So that I could still work on other things while I waited for more thread, I had to rig up a hanging station. I was quite pleased that my stash shelves were so perfect for this purpose. Linus hung out like that for the rest of the weekend.

I finished quilting Linus and attaching the facing at 11:30pm on May 31, hours before I left on a trip to Michigan for the weekend. I took the quilt with me, since it could be folded now — and attached the facing in the airports and on my friends’ back deck.

Here’s Linus with the facing partially attached, in Sue and Brian’s kitchen.

After the weekend was over, I had professional photos done so that the colors would be better and lighting would be more consistent. The next 5 photos are by Jeff White.

And Jerry took this last one: Friday wanted to say hello to his old friend.

Linus will hang around in his favorite room in the house unless and until he travels.

Jerry asked me what my next big bucket list quilt will be. I said, “You know… I’ve been in the revenge business for so long… now that it’s over, I don’t know what to do with the rest of my life.”

So. I don’t know what’s next. I haven’t been told yet.

Ideas?

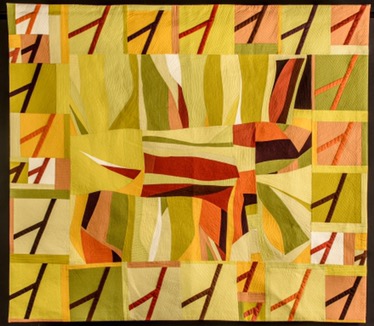
Rhinoceros in the Garden

In early 2015, while watching House of Cards on Netflix, I impulse-ordered a huge selection of Kona Cottons from Fat Quarter Shop.I made the obnoxious request that every color be labeled for me so I could easily identify them should I need to order more at some point, and to my surprise and delight, FQS honored that request. The saliva-inducing, carefully-labeled stack of fabrics arrived a few days later. I arranged and arranged them, pulling subsets and groupings out to make a series of matching pieces that could one day hang in our home, since every one of these fabrics goes with the color schemes we chose when renovating back in 2012. This small grouping was one of the subsets I pulled out last fall. Wanting to do some more work with improv piecing and larger chunks of fabric, I just started to play. I struggle with negative space, so initially I was trying to leave big pieces of unbroken color for myself. I shortly learned that I’m still not really ready for that. I’ll get there, but I guess I’m still in a visual clutter phase in my artistic expression. After a while I got a composition that I liked a lot, so I trimmed it all squarish and sewed it together and stood back to admire how free it was. The ordered mathematician side of me complained bitterly, so I decided to play with repetition and scale to use up the remaining fabrics left from the pull, since they were still sitting there on my cutting table. I have found that when I do improv work, I have to chase it with regimented piecing so that I still feel balanced. 
I was heavily influenced by a more free version of this shape, created by dear friend Connie Carrington in her quilt View from the Treehouse, when constructing these birdie feet. She had begun a project using a free-pieced version of this shape while we were at a quilting retreat some time before and I watched with utter fascination as she built the piece. Rather than copy her outright, I used rulers and careful angles to silence the need for order in my work after an improv binge. The two sides of my brain arranged themselves nicely on my design wall, unified in color and basic size. And then they wanted to interact. Funny how much better I liked both explorations when they were combined! In this photo I covered the dominant chunk of white in the center with a discarded chunk of improv pieces, because it was too strong. Afterwards I hacked into the center section to remove that white and insert the discarded section in its place.Then I sewed it all together, adding straight pieces of fabric where needed to get the border to go all the way around. I had to do some significant surgery on it to get it rectangular and flat before quilting, but ultimately I was successful. IMG_1842 

As for the quilting, I chose to quilt it densely with organic lines and matching thread in each section.IMG_2276Every bit of it is quilted except for the birdie feet, which I wanted to be puffy and stand out. IMG_2289 IMG_2294 To me, it looks like a rhinoceros hiding behind the hosta in a garden, because I’m sure they do that. And birdies all around. IMG_2300I faced it so that there’s no hard line around the piece, and I love how it turned out. Jeff White took the finished photo (below) of it, which shows the rich colors very well. 

Making Faces with Melissa

In April, my mom and I went to Chattanooga for the weekend to take a class hosted by Spool and the BadAss Quilters Society with Melissa Averinos, who had just won the Best of Show award at QuiltCon about 6 weeks before. The class was called “Making Faces with Melissa,” and you can find work by her students all over Instagram by searching with the hashtag #makingfaceswithmelissa. Go ahead: I’ll wait. It’s worth the browse.

Ok, welcome back. Wasn’t that awesome?

Since Mom is a talented portrait artist and wants to do more quilt portraits of her grandchildren, I thought this class would be perfect for her. When we realized she would be in town that weekend, we decided to sign up for both days and make a girls’ weekend of it.

Here’s Melissa teaching, next to a display of some of her face quilt samples. 

The class started with an intensive face drawing lesson, where she explained facial structures using geometric terms that my little math nerd brain could definitely understand. Mom has explained all of these concepts to me before, but it was very interesting and clarified a few things for me that I hadn’t realized that I didn’t fully understand. We had a booklet for lots of practice drawing. 

Before the drawing class, she had us draw a face in 90 seconds without questioning our abilities, and then at the end of the class we drew another face. She said we would amazed at our growth and we all were. Exhibit A:

After lunch, we started to play with fabric, using the concepts she had taught in the drawing class. 

Initially I was going with the stylized look that is Melissa’s trademark, because I love it so. I challenged myself to only use batiks, because my batik stash is so huge and they can be used on either side. I like to give myself little rules when I’m starting a project because I find that I’m less overwhelmed by the blank canvas. 

Melissa encourages students to work on more than one face at a time, so that if you get stuck on one you can shift to another and work until you know what to do next and can come back with a fresh perspective. This proved to be hugely valuable advice. The first face was looking a bit more tribal than I wanted, so I switched to my second face. 

And here I started to find my voice more readily. Using larger chunks for hair made the process faster for me, and was one of Melissa’s suggestions to me as she wandered the room encouraging everyone. 

When I had a moment I went to the front and took photos of some of her faces.  These three were a series that she did all at the same time that I absolutely loved.

(made by Melissa Averinos)

Before long, the first day of class was over and we had to leave until morning, which was torture. I left my iPad under the only window in the front of the room, so I had to call Maddie to let me back into the venue to get it. Thank you so much!  (I was so embarrassed. I’m not usually so flakey but I was in.the.zone. at the end of class that day and struggling to think logically.)

Mom and I checked in at the hotel and then walked to Urban Stack for a Whiskey Smash. Mom needed to experience the loveliness that is a Whiskey Smash (not sure if that’s the recipe they use but you get the general idea). We were not disappointed. 

Then we walked to the Public House and wandered around Warehouse Row until our reservation time. In Anthropologie I did some virtual shopping for friends– by sending photos of things I would buy to give them if I were a gazillionaire. For Laura… and for Sue and Rene because of the title:I love “shopping” this way because it costs nothing, they know you’re thinking of them and you don’t give anyone extra clutter to deal with. Heaven knows I’d rather have the thought than the stuff.

Finally it was time for dinner! We shared a bottle of Tempranillo and ordered the pot roast. I love this picture of my mom. So cute!

And the pot roast. Ohhhh, the pot roast. Have the pot roast if you go to Chattanooga. It’s stand-up-and-slap-your-grandma good. Not that I’d slap my grandma. But still. It’s quite tasty. And I don’t usually like pot roast all that much but Jerry and I were encouraged to try it last summer, and it was i.n.c.r.e.d.i.b.l.e. … and gluten free! Bonus!

That night, we went to bed at a shockingly reasonable hour (9pm! I know!) and then got up bright and early for breakfast and then day two of Melissa’s workshop. This is what greeted me when I arrived back at my table. Hmmm… which to work on?

I decided to play with the “Androgynous Pixie King,” as I was calling him at the time, since the “Ice Princess” had me stumped again. It was so cool to just add more and more layers to get the look I wanted, knowing that none of this was permanent and I could rip it off and move anything. We used Elmer’s disappearing purple glue stick for this part of the process, and glued down more permanently with micro-fine glue tips and Elmer’s School Glue when we wanted to be sure our pieces didn’t shift.

At this point, I kind of deviated from the stylized approach that Melissa had been teaching, because I got an idea for how to conquer a quilt idea that I had started three other times since 2006. All three times have ended in frustration and a trip to the trash can, but for whatever reason, what Melissa said in class and the process of working with these faces gave me a sudden epiphany for what I wanted to do. But before I could do that, I had much more to learn to be certain that this approach would truly work. Melissa was very gracious and encouraging as I went off the path, for which I will always be thankful. This is one of the many reasons that I am very very glad that I took her class.

So I continued working on the Pixie King, adding and subtracting to get the shadows right.

His hair bugged me but I didn’t know how to fix it really, so I concentrated on his face.

More and more details. Oh, man. Yeah, this approach was definitely going to work for that long-dormant project. Very much yes. The rest of the afternoon was kind of a blur. I meant to go around checking out the work of everyone else but I was just a marionette being controlled by the creative muse controlling my strings.

Around lunch on the second day, Melissa asked us to glue down as much as we could so that we could display at least one of our faces with the work of everyone else in the class. So I adhered the Pixie King and pinned him up. It was SO cool to see how people were running with the ideas in class, and interpreting them in different voices. We went around the room and discussed our own work and admired the grouping of faces on the design wall, which was a really great thing to be able to do in a class. So often I leave quilt classes wishing I could have seen what everyone else was doing with the same instructions. You can learn a lot from people that way.

Then we had lunch, and I left the Pixie King in this state and returned to the Ice Princess for the remainder of class.

She got more and more layered, too, and I had fun adding some wild colors to her hair.

And then we did a guided construction of a face using Melissa’s directions, so I did get to go home with a more stylized face at the end of class too. I’m glad she did that, so I don’t forget her approach — it’s fantastic. (I cannot for the life of me get this photo to orient properly, even though it seems to THINK it’s upright in the file… Stupid picture. Maybe I’ll reload it. In the meantime, turn your head sideways. Kthxbai.)

Here’s my mom’s “Dude,” as he looked at the end of class. He had a theme song: the main theme from “The Good, the Bad, and the Ugly,” doesn’t he?

Mom also worked on this as her second face in the class. It was amazing to see how different the facial expressions could be just by slight adjustments in the angles of the eyes and brows.

Here is where my two faces were at the end of class. We glued everything down to secure them, rolled them up, and drove home. I could not wait to get back to them.

The next night, I added a lot more to the hair of the Ice Princess, and made some subtle changes to her face to get the shadows how I wanted them. I debated making her eyes a more reasonable size and less Disney-like, but ultimately decided to let her be a little stylized since that’s how she had started in Melissa’s class.

Once I had her face the way I thought I wanted it, I decided to deal with the background. Having a floating patterned head on a solid background bothered me, so I hacked up a bunch of neutral batiks and spread them out around her face. I sent this photo to Mom, who wrote back, “Are you going to bring her hair back to the front? I liked her hair.”

Very carefully, I released the wisps of hair from the solid fabric and brought them in front of the batiks, which I was definitely planning to do.

A bit more tweaking as I fixed her jaw shape and nose, and then it was time to quilt. I chose a pale green thread, as it was the least distracting on all of the colors in the piece and gave a really nice texture. I quilted organic lines about 1/8″ apart, adding pebbles to give variety in the background area.

The slivers of fabric presented some issues as I quilted, because the glue would pop loose and tips would shift. I spent a lot of quality time stopping the machine and pushing the shards back under the needle so they could be quilted down. As a result, a few things shifted out of place or broke off entirely, but I still liked the final piece. Helen recommended binding it in a pale green to give a low-contrast border to the piece. I love that choice, especially since I had used a similar green for some of the shadowing on her face.

Here’s an extreme closeup of the quilting on her face.

Meanwhile, Mom was making adjustments to her Dude and we were both sending pictures back and forth to cheer each other on. She realized that she had accidentally omitted his ears, so here she was auditioning ear colors.

A few nights later, I worked on the Pixie King again, first adding his background before too much more hair got added — I learned my lesson from the Ice Princess that adding the background after the fact was difficult and somewhat destructive, so I changed my approach.

Then I decided that perhaps it wasn’t a Pixie King at all — but a girl. Specifically, I wanted her to have a braid like Katniss Everdeen, and more specifically like the one in this photo:

So I just started building a braid and adding more hair on the sides of her head. Farewell, Pixie King!

Allrighty then, since it was a girl and the eyelids were looking a little washed out (especially as compared to the Ice Princess), I gave her some smokey eyes and she seemed to come alive.

I quilted her with the same thread and style, and trimmed her to the exact same size so that they can hang together. It wasn’t until after I was finished that I realized that their colors were reversed — which wasn’t originally intentional but makes them work together so much more.

Again, quilting on a stationary machine over shards of fabric presented challenges, because tips would shift and have to be readjusted as I worked. I knew that I would need to find a work-around for this issue because of the type of quilting machine I’m working with. Melissa takes her pieces straight from her work table to her longarm quilting machine, so it doesn’t get manhandled the same way as mine do with the back-and-forth motion of quilting with my stationary machine.

Even so, I think that both faces turned out very well, and I learned a tremendous amount in the process.

And, as always, Friday was happy to test the quilts for comfort as they were finished and laid out for photos. He does love his Internet fans.

The most exciting thing for me was knowing without a doubt that the process that I had used to create the faces would very definitely work to finally make the Linus Photo Quilt, which was first mentioned on this blog on January 1, 2006. The three times I had started it before left me very frustrated because they weren’t going to turn out the way I could envision the final quilt in my head.

I kept the large-scale enlargement of the photo from 2006 and all of the (many) tracings that I had done, even though I threw away each fabric attempt when I knew it wasn’t going to work, a decision I do not regret.

This time, I knew exactly what to do and had figured out the medium and style in which to do it, and what modifications I would need to make to the technique Melissa taught in her class so that a project of this scale would be manageable with the materials I have available.

I cannot wait to show you the process of building the quilt honoring our sweet Linus, but that will be a post for another day… I’ll post it very soon, I promise — as soon as I get good photos of the finished quilt from the photographer. We have an appointment for a photo session tomorrow!