2019: Slowing Down?

Social media is kind of the “fast food” of blogging and interactions online. I gave up blogging– without really meaning to do so– back in 2016, and spent my time posting little bites of life on Instagram.

I have found that I miss the slower process of blogging, much because of the art journal it proved to be for me and my process. Not as many people comment on blogs as in the past, I guess because of Instagram and other quicker forms of social media.

But blogging is as much for me and watching my growth as an artist as it is for the interaction.

I need to bring that back into my life. My artistic explorations reached a high point in late 2017 and have sort of decreased over the past year. I think that the lack of documenting my process in longer narratives here has been part of that.

So I’m preparing several posts for January now, and I hope you’ll join me. And I hope that I’ll resume the habit going forward, and perhaps see a creative burst come from lingering more intentionally with my work.

Hopefully I’ll share more works in progress instead of only grand finishes. Maybe that’s why I lost interest– everything had to be so big and it was exhausting. I will start with some finished works that need to be documented, but in time I want to share more of my process, including the low points as well as the high points. As artists we all need to see that others experience the same ranges of emotions as we do, instead of hiding the struggles behind triumphs.

See you soon?

Pearls on the Clamshell

I’m part of the Color Inspiration Club at Pink Castle Fabrics, and every month they send me ten half-yards of different solid fabrics. Before I put them on cards and store them in color order on my shelves, I cut off 2 2.5″ strips of each color, which I then sew together-cut apart-sew together again into wonky stripsets like you see below. Ella always shows up for the photo shoot, of course. 

The strip sets (usually around 10 feet long in total) hang around folded on my shelves until I decide what to do with them… usually I combine them with solids or tonal prints into a traditional or familiar block of some sort, because that seems to be the type of modern quilting that is most comfortable for me. Pure improv is a challenge for me, but this kind of improv I can handle. 

With this stripset, I decided to use the 6″ quarter circle templates by @bettycrockerass and Kona Snow, and make a bunch of drunkard’s path blocks. Glue-basting with Elmer’s washable school glue and the ultra fine tip applicators makes sewing these curves a breeze, even with all of the extra seams. 

I did a few blocks to see if I liked the effect before I committed to hacking up the rest of the strip set. I liked it, so I kept going. 

Oh, yes. 

Then I started to play with more traditional settings of the blocks. 

Yes, yes, yes! I was able to get 64 blocks out of that one stripset. Amazing! 20 2.5″ strips goes a long way! I did have to Frankenstein the last concave piece to get the 64th block, because I was NOT going to cut any more fabric. 

Then I started playing with arrangements. 

And I happened on this one. I loved the full circles that showed up. But I felt that it needed a border. 

I took the remaining 13″ of the bright pink fabric and made as many more blocks as I could. I was able to get halfway around. 

I considered having the other two borders in a different color (the seafoam green was the frontrunner) but Ella informed me that I was finished. 

After I got the longarm, I knew how I was going to quilt this one and I got a set of curved rulers from The Quilted Pineapple for that purpose, but I was terrified to start. Finally I just made a backing, loaded it, layered on cotton and wool batting, floated the top on the machine, and went for it.  

Maintaining a consistent width to the echoes while the circles changed circumference meant I had to switch rulers often, and it was an incredible learning experience. The quilting turned out even better than I anticipated! I loved bringing the double wedding ring design into the quilting and what it added to the piece. I bound it in the seafoam green on the unbordered edges and another piece of the same pink that was buried in my stash to continue the pink border. When I hung it up on the fence, I decided I liked this orientation better than when I had first put it up on my design wall. 

Please disregard any loose threads you might see… 

Friday loved looking at it and testing it for warmth as it came off the rollers. I think he approved!

The wool batting was a challenge because it was so fluffy on top of the cotton, so I had to do a lot of measuring and pinning to keep everything squared up. 

Considering it was my first real effort on the longarm custom quilting with rulers, I am very happy with how it turned out. I named it “Pearls on the Clamshell” because of the strings of pearls that seem to be superimposed over the string/Clamshell blocks.  

It’ll be at QuiltCon next weekend in Savannah, too! 

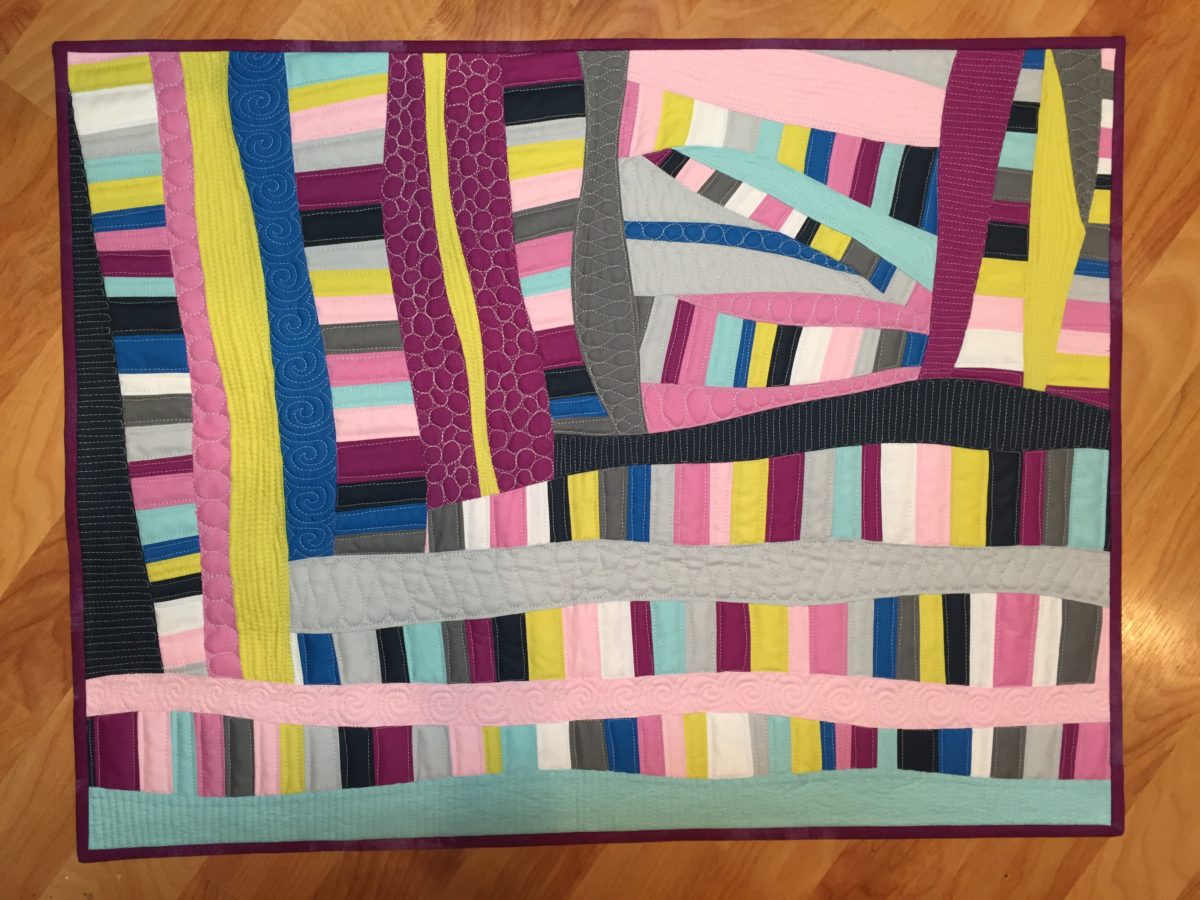
The Plan Without a Plan, an Improv Quilt

Last winter, it was gray and gross for a really long time. Or at least it felt like a really long time. Mostly because it’s always gray and gross all winter here so I can get kind of cranky.

Since petting fabric always makes me feel better, I started pulling springy fabrics out of my stash to try to break the mood. Then I decided to try some improv, but rather than just haphazardly making cuts, I gave myself a few rules… I had been watching Cheryl Arkison’s “Improv With Intention” classes on Creative Live, after all. Here were my rules:

  • 3 colors (poppy red, citron, spring green) and a background (white/off-white)
  • Cuts had to be straight and square cuts, and all measurements had to be in 1/4″ increments
  • Skinny (1/2″ finished) strips had to be solid or tonal prints.

After one night of playing, here’s what was up on my wall.

IMG_2602

I was having a blast, so I kept going, pulling more and more fabrics from my stash that worked in this colorway.

IMG_2605

Already, the winter doldrums started to feel a bit better and my sewing room looked springy!

IMG_2610

Of course, since I can’t leave well enough alone, I decided that I might want a sparing scattering of diagonal lines to give the piece some extra motion. I made a few to see how they worked with the rest of the composition, and liked the result, especially since there weren’t very many of them.

IMG_2634

A few more evenings of work and rearranging, and it was starting to find some structure and cohesiveness, but I was finding the color palette to be a little too limiting.

IMG_2650

My solution was to add some skinny strips of aqua fabric to break things up, but again, I didn’t want to add too many because I didn’t want them to take over. I liked the result much better.

IMG_2677

Then it was just a puzzle of partial-seam constructions and careful measuring to keep everything squared up as I assembled the pieces together. There’s only one bizarre Frankenseam in there where I had to pretty much make ritual sacrifices to get it all put together, but I couldn’t even tell you where it was now.

IMG_2703

Once I had the middle of it all assembled, I left town for a school trip. When I got back, I added some more of the background color and extended a few of the blue strips into the border to give some visual relief to the piece.

IMG_2858

I wanted to quilt it densely in such a way that the piecing was featured, but the quilting was an extra treat if the viewer got close to it. So I made rules for the quilting, too — just so I wouldn’t be paralyzed by indecision when I was ready to quilt.

  • Prints were quilted with matching solid threads (exception: darker green prints were quilted with variegated thread because I didn’t have the right color solid thread)
  • Solids were quilted with matching variegated threads
  • Aqua strips were left unquilted
  • I also limited myself to a handful of free-motion fillers: hook swirls, pebbles, wavy lines, ribbon candy, and headbands
  • Adjacent sections wouldn’t have the same quilting design if it could be avoided

I bound the whole quilt in an aqua print to match the skinny solid strips, which framed the finished composition nicely.

Here are a few closeups of the quilting process as I was going along. The hook-swirl filler is one of my very favorites, because I’m able to keep the swirls a consistent size and I’ve gotten pretty good about self-correcting my path so I don’t get trapped in corners. I buried all threads at the edges of the sections rather than traveling to the same color along seamlines. I also didn’t stitch in the ditch anywhere (and actually, when I’m quilting densely like this I usually don’t bother since I’ll be hitting the ditch about every 1/4″ anyway).

I pin-basted the quilt a lot, so I was able to jump around and quilt different sections without changing thread colors until I was ready. Each night I’d fold it back up on my quilting table, and it was fun to watch it get thinner as the batting compressed under the quilting stitches.

I even experimented with my tried-and-true Ribbon Candy fill in a few places, just to combat boredom or fill in a too-large-scale section. I loved how this triple ribbon looked on the back of the quilt in a variegated cream/beige thread.

Because of the density of the quilting, it became very obvious which sections remained to be quilted as I got further and further along.

Matching the bobbin thread to the top thread meant that the back of the quilt was just as interesting to look at as the front, for different reasons. It also helped me check for density changes that I might want to fix.

I like the back almost as much as the front.

I love this quilt, even though the whiteness makes it totally impractical for use as a throw. But it sure is pretty — on both sides!

Here’s a look at the front again…

Twenty Strips

I was a member of the Color Inspiration Club at Pink Castle Fabrics last year (and will be again– I signed up again), which meant I was sent 10 solid fabrics a month from a collection of colors selected by the shop. When the fabrics arrived, I’d immediately cut off 2 2.5″ strips from each one before I put the fabrics away. Then I’d roll up the twenty strips together and put them on my ironing table to tempt me. 

Between projects when I just want to see without a plan, I just grab things like those rolls of strips and start sewing. 

This time I decided I’d do half of the strips in a big stripset like I have done in the past. The remaining half would be used to assemble those into a single mini quilt. I did not permit myself to add any additional fabrics and I challenged myself to use as much of the twenty strips as I could.

Fun coincidence– I had already made the strip set when the pictured issue of American Quilter arrived. That made me happy! I’m on trend!


It was so much fun!

The resulting piece is about 24″ x 18″, and I custom quilted it. 


The binding is a scrap of binding I had left in Moda Grunge in plum. It finishes the little quilt perfectly!

 IMG_2273 (Edited)