Modern Quilt Pattern
© 2012 by Elaine Wick Poplin
UPDATED 3/23/2016 to remove bizarre symbols that were added in the most recent WordPress update. My apologies if you’ve had difficulty reading this tutorial in the past month — I was unaware that there was an issue until this morning.
This quilt block is very simple to make with little waste and lots of opportunity for variation. Please feel free to contact me at epoplin (at) gmail (dot) com or @epoplin on Twitter if you have questions/suggestions about the pattern so I can improve the tutorial.
Materials:
24″x24″ wall-hanging or or 12″x48″ table runner:
¾ yard light solid
¾ yard dark solid
4 1″x30″ strips of brightly colored fabrics that contrast well with the light/dark solids
60″x72″ lap quilt:
2¼ yards light solid
2¼ yards dark solid
30 1″x30″ strips of different brightly-colored fabrics that contrast well with the light/dark solids
Wall-hanging/Table Runner Cutting Instructions
Light Solid
Cut 1 (one) 6.5″ strip WOF
– cross-cut 2 (two) 6.5″ squares from this strip
– set aside remaining piece of this strip.
Cut 2 3.5″ strips WOF
– cross-cut each strip into 2 (two) 7.5″ segments and 2 (two) 13.5″ segments
Dark Solid
Repeat same cutting instructions as for Light Solid.
Brights Cross-cut each 30″ strip:
– 2 (two) 6.5″ pieces
– 2 (two) 7.5″ pieces
You should end up with
2 6.5″ squares each of Light Solid and Dark Solid
4 3.5″x7.5″ pieces each of Light Solid and Dark Solid
4 3.5″x13.5″ pieces each of Light Solid and Dark Solid
plus the 30″ multi-colored bright 1″ strips cut into 4 pieces each.
Lap Quilt Cutting Instructions
Light Solid
Cut 2 (two) 6.5″ strips WOF (width of fabric)
– cross-cut into 6 (six) 6.5″ squares
Cut 1 (one) 7.5″ strip WOF
– cross-cut 3 (three) more 6.5″ squares from this strip (you will be trimming off 1″)
– from remaining part of 7.5″ strip, cross-cut 5 (five) 3.5″ segments
Cut 15 (fifteen) 3.5″ strips WOF
– cross-cut 5 (five) strips into 7.5″ segments
– cross cut 10 (ten) strips into 13.5″ segments
Dark Solid
Repeat same cutting instructions as for Light Solid.
Brights
Cross-cut each 30″ strip:
– 2 (two) 6.5″ pieces
– 2 (two) 7.5″ pieces
You should end up with
15 6.5″ squares each of Light Solid and Dark Solid
30 3.5″x7.5″ pieces each of Light Solid and Dark Solid
30 3.5″x13.5″ pieces each of Light Solid and Dark Solid
plus the 30″ multi-colored bright 1″ strips, cut into 4 pieces each.
Assembly Instructions for all sizes:
All seams should be scant ¼” seams, fabrics sewn right sides together. Seams should be pressed open or pressed to one side, whichever is your preference.
STEP ONE. To each Light Solid 6.5″ square, sew same-color bright 1″x6.5″ pieces on opposite sides, as shown in Fig. 1 below. Press seams according to your preference.

Figure 1
To each of the above units, sew same-color bright 1″x7.5″ pieces on the top and bottom, as shown in Fig. 2 below. Press seams according to your preference.

Figure 2
Repeat for each of the Dark Solid 6.5″ squares.
STEP TWO. To each of the Light Solid-centered pieced units from Step One above, sew 3.5″x7.5″ Dark Solid segments to opposite sides, as shown in Fig. 3. Press seams according to your preference.

Figure 3
To each of the above units, sew 3.5″x13.5″ Dark Solid segments to the top and bottom, as shown in Fig. 4. Press seams according to your preference.

Figure 4
Repeat for each of the Dark Solid units from Step One.
STEP THREE. With a Light Solid center block in front of you, make a mark 5″ to the left of the lower right corner, as shown in Fig 5.

Figure 5
Rotate the block in either direction and make the same mark in the same position for all four corners (always 5″ in from the right corner).
Using an 18″ (or larger) quilting ruler, cut the block from a marking on one side to the marking on the opposite side. Without moving the block between cuts, make a second cut joining the other two marks, as shown in Fig. 6.

Figure 6
Repeat for remaining blocks.
ALTERNATIVE CUTTING INSTRUCTIONS : Cut half of your Light Center and Dark Center blocks as above, but cut the rest by making marks 5″ to the right of the lower left corner, i.e. cut the MIRROR IMAGES for half of your blocks, as shown in Figs. 7a and 7b below. This will not work for the wall-hanging size, as you need at least four blocks cut in each direction for the design to work.

Figure 7a

Figure 7b
STEP FOUR. When all of your blocks are cut, it’s time to play! All of the pieces are (hypothetically) the same size, so you’ll be creating new blocks by mixing and matching the cut pieces and sewing them together.
Find a combination of four quadrants that you like, arranged so that the interior square is a checkerboard and the exterior square is also a checkerboard, as in Fig. 8. (Note: in the figure above, I used three different solids for my interior and exterior squares, which provides yet another interesting effect)

Figure 8
Pin two adjacent quadrants together, matching the thin contrast strips at the seam allowance. IT IS OK if the centers and edges don’t match perfectly at this point; you will be trimming them anyway.
Sew the pieces together, starting on the INTERIOR SQUARE (the gray part in Figure 9) and working out to the outer edge, as shown in Figure 10.

Figure 9

Figure 10
Press seams open to reduce bulk, as in Figure 11.

Figure 11
At this point, you will probably notice that the edges of the interior square do not line up exactly. This is fine! We will just trim it straight before proceeding to the next step as in Figure 12.

Figure 12
Match up your sewn halves, matching the centers and the contrast bright strips the best you can, being very careful with the bias edges (Figure 13). Sew the block and press the seams open (Figure 14).

Figure 13: matching the centers and strips

Figure 14: seams pressed open
TA DA! Here’s the finished block. It’ll measure about 13″ unfinished, but none of the edges will really be perfect so it’s time to trim! You can carefully trim the blocks to 12.5″ unfinished for the effect I have in my samples, or to any other size larger than 8.5″ (smaller than that and there won’t be much of an effect). Your squaring can be straight or wonky, depending on the size square you choose. The smallest wonky block you can cut will be 9.5″ unfinished, or you’ll cut into the contrast strips.

Finished block, untrimmed

Finished block, trimmed to 12.5″ square
Figure 16 – after trimming to 12.5″ unfinished
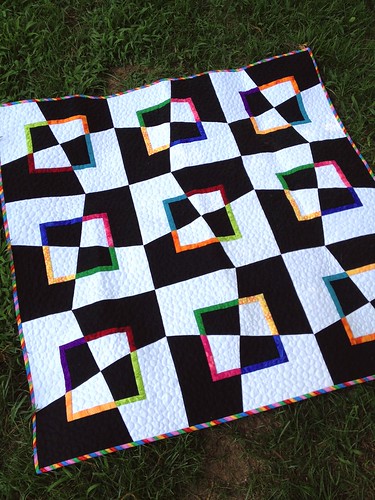
Here’s one arrangement I came up with after getting a few blocks made. This is the wall-hanging size. All of these blocks were cut the first way. Using the Alternative Cutting option and cutting mirror images would provide a very different (and cool!) look and I can’t wait to try it!

Four Blocks, playing on the design wall
Then I started playing on my design wall.


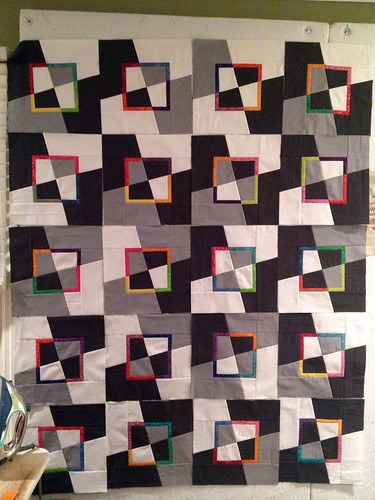
option 2
And here’s one with the Alternate Cutting instructions… I discovered that with the AC instructions you MUST HAVE MULTIPLES OF FOUR BLOCKS or it won’t be as easy to distribute your colored strips.
The possibilities are endless! Let me know what you come up with!
189 Responses
Get the best ophthalmologist – Harlan Ophthalmology that is now available and a specialist in cataract and LASIK surgeries today!
Hire the the top roofing near me that give free estimates that’s now available in addition at good rates now only!
Find the best philadelphia roofing co that’s now available in addition at reasonable prices now only!
Find the best ophthalmologist – Ivey L. Thornton that is now available in addition highly professional today!
Hire a top roofing contractor in philadelphia pa that’s now available in addition on sale now only!
Get the the top ophthalmologist – Ophthalmologist that’s now available in addition with expert knowledges today!
Hire a top ophthalmologist – Ivey Thornton, MD that is now available in addition highly professional today!
Hire a top ophthalmologist – Ophthalmologist in Omaha, NE that’s now available and a specialist today!
Hire a top roofing company in pennsylvania currently now available in addition at reasonable prices now only!
Get the the top ophthalmologist – Ivey L. Thornton, MD, PCEO that’s now available in addition with expert knowledges today!
Find a top ophthalmologist – refractive eye surgery that’s now available and a specialist today!
Get the the top roofing company philadelphia that is now available and on sale now only!
Get a top standing seam metal roof currently now available and at good rates now only!
over at this website
Get the best roofer philadelphia that’s now available and at reasonable prices now only!
roofer in philadelphia
Get the best roofing company pa that’s now available and on sale now only!
roofing companies
Find the the top roofer contractors that is now available in addition with reasonably pricing now only!
more helpful hints
Find the the top roofing company pa that is now available in addition at good rates now only!
philadelphia roofing contractor
Get the best residential roofing services that’s now available and with reasonably pricing now only!
roofer near me open now
Get a top roofing contractor philadelphia that’s now available in addition on sale now only!
roofing company pa
Find the best roofing company pa that’s now available in addition at reasonable prices now only!
roofing in pennsylvania
Hire the the top roofing contractor currently now available in addition with reasonably pricing now only!
more helpful hints
Get the the top roofing contractor philadelphia that is now available and at good rates now only!
roofing company in philadelphia
Hire a top local roofing companies that is now available in addition with reasonably pricing now only!
roofing company pa
Get a top philadelphia roofing contractor that is now available and at reasonable prices now only!
roof repair in york pa
Get a top philly roofing company currently now available and at reasonable prices now only!
click here for more info
Find the the top philadelphia roofing company currently now available in addition at reasonable prices now only!
??????? ????????? ?? ??? ?????? ??????? ????????? ?? ??? ??????
roof repair in york pa
Hire a top philadelphia roofer currently now available and at reasonable prices now only!
roofing contractor
Hire the the top roofing contractor philadelphia that’s now available in addition with reasonably pricing now only!
roofing contractors philadelphia
Find the the top philadelphia roofing company that’s now available and at reasonable prices now only!
roofing contractor in philadelphia pa
Hire the the top roofing philadelphia that’s now available in addition at reasonable prices now only!
roofing contractor in philadelphia pa
Get a top roof replacement company that’s now available and at reasonable prices now only!
corrugated metal roofing
Find the best roofing estimates that is now available in addition at good rates now only!
local roofers
Get the the top roofing near me that give free estimates that’s now available and at reasonable prices now only!
roofing contractor in philadelphia pa
Hire a top roofing company in philadelphia currently now available and at reasonable prices now only!
philadelphia roofing contractor
Get the best roofing contractor in philadelphia pa that’s now available and on sale now only!
roofing contractor in philadelphia pa
Hire the the top roofing near me that is now available in addition with reasonably pricing now only!
roofing near me
Get the the top roofing contractor philadelphia pa that is now available in addition on sale now only!
roofer philadelphia pa
Get the the top roofers currently now available in addition with reasonably pricing now only!