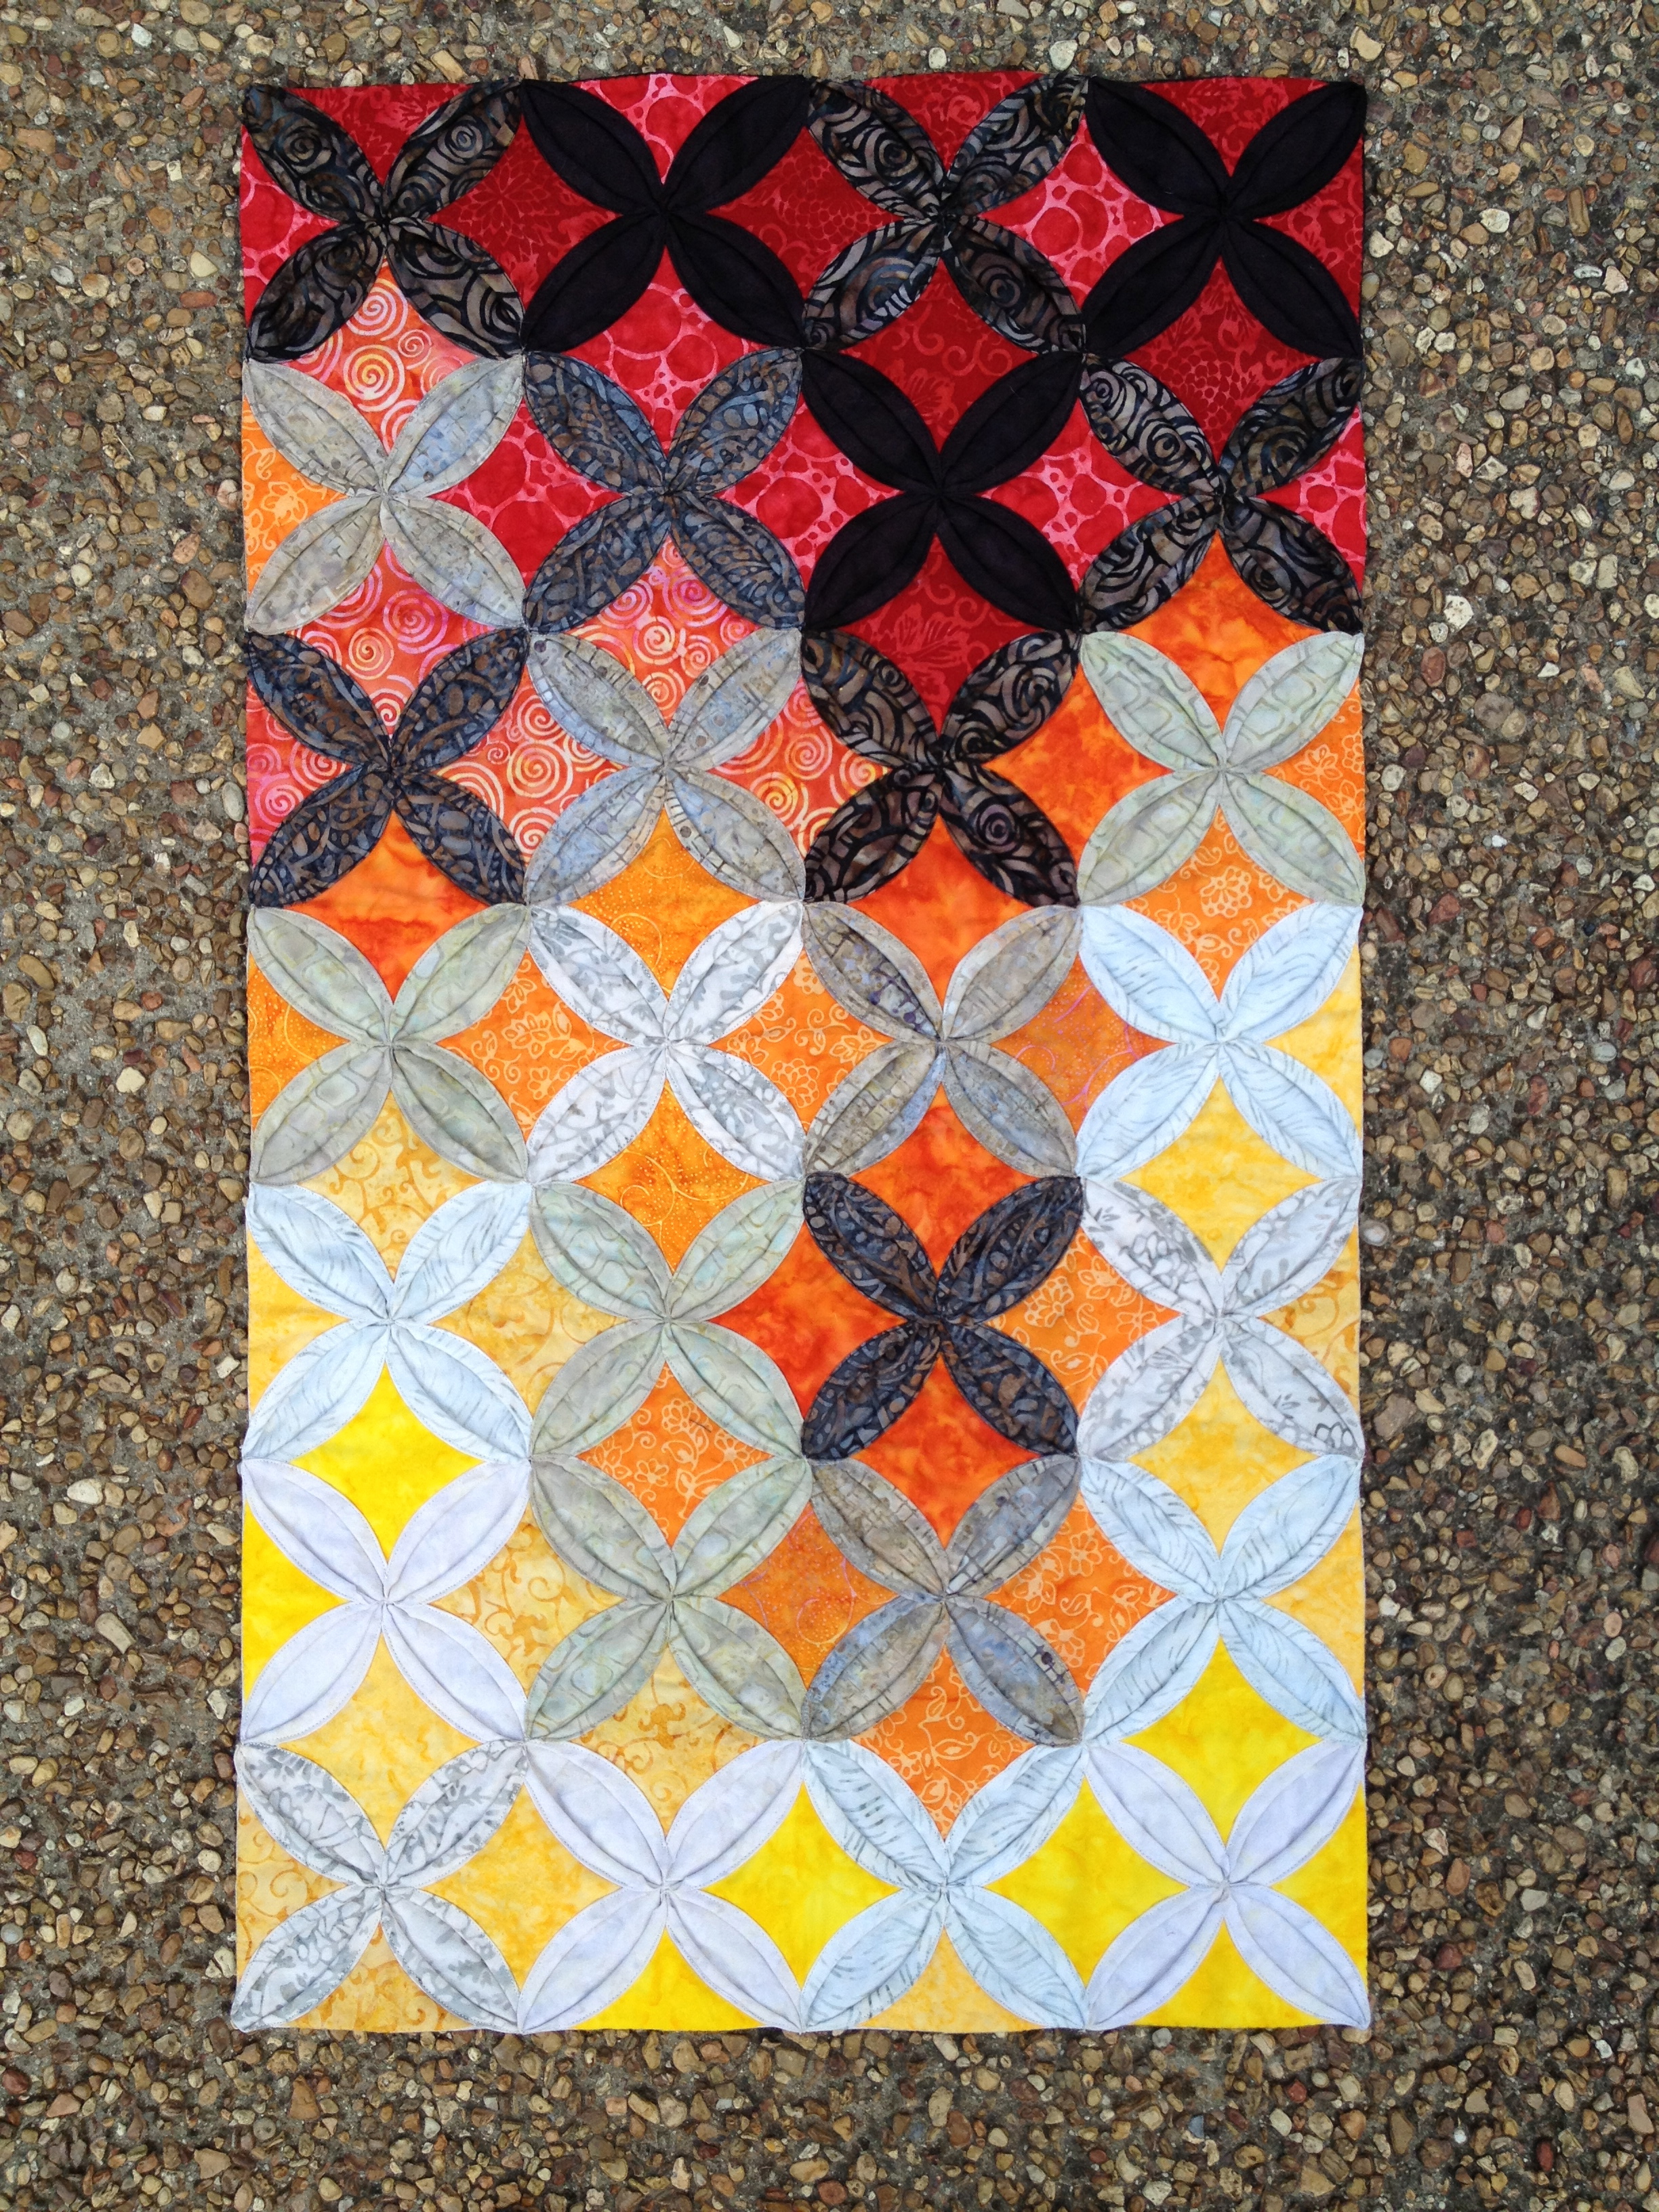
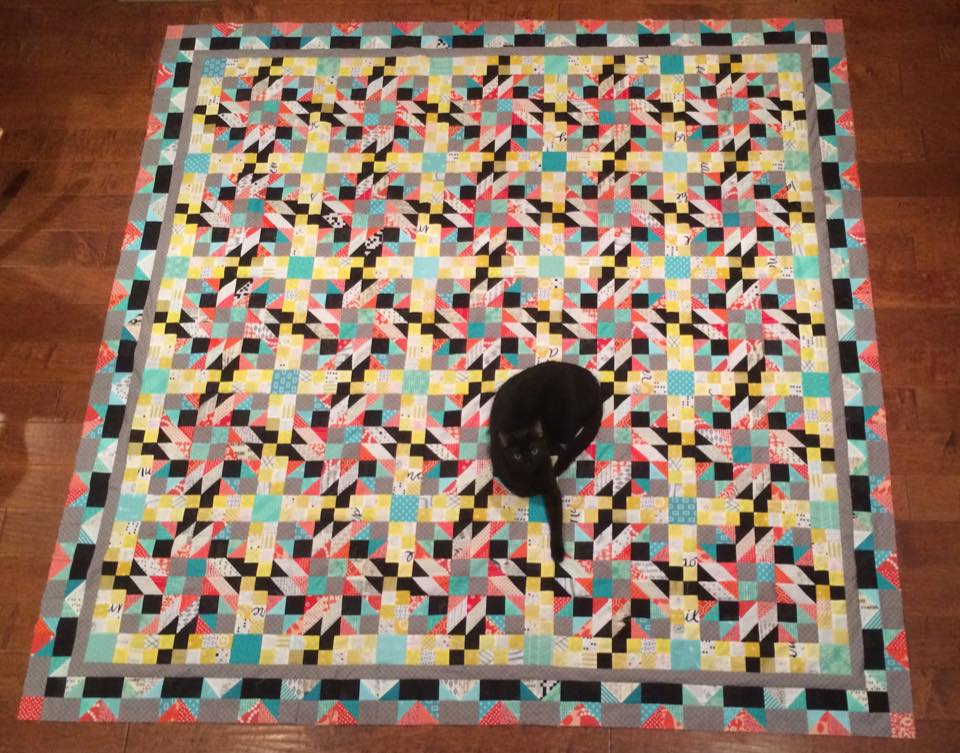
(This post is very image-heavy, so you might want to wear a helmet. You’ve been warned.)
Borrowed from Lynne Goldsworthy’s blog: last week and this week we are bringing you eight projects from eight fantastic designers using Oakshott Scandinavia. Today is my turn! Check out the ideas that have been shared by the other talented designers below.
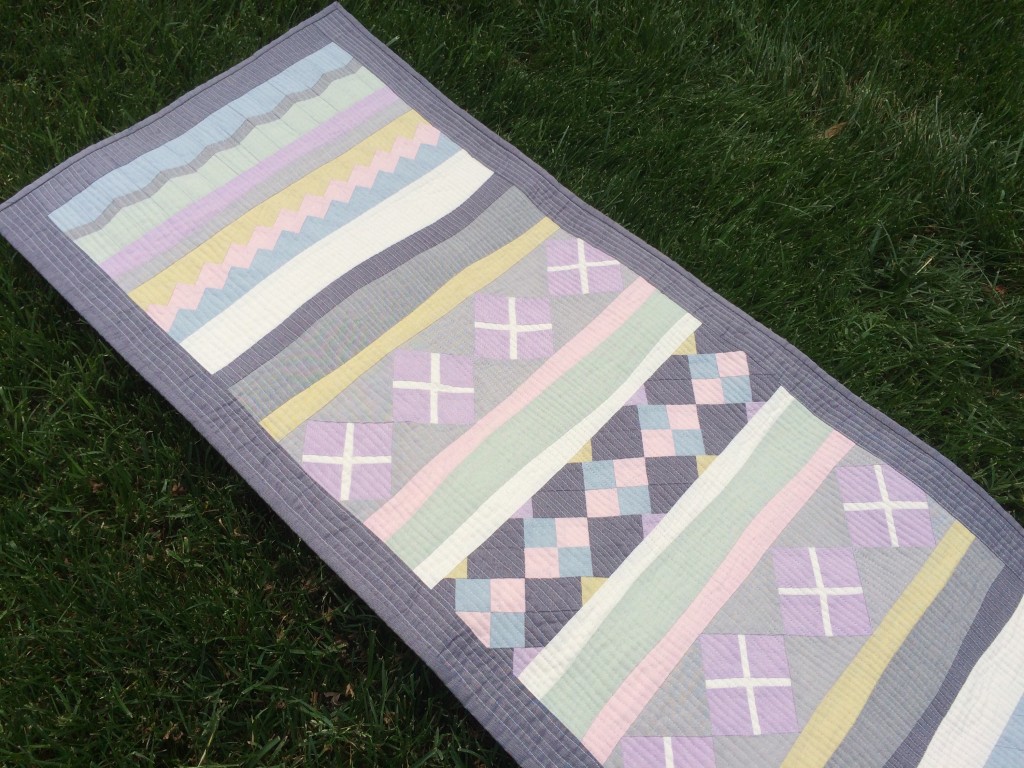
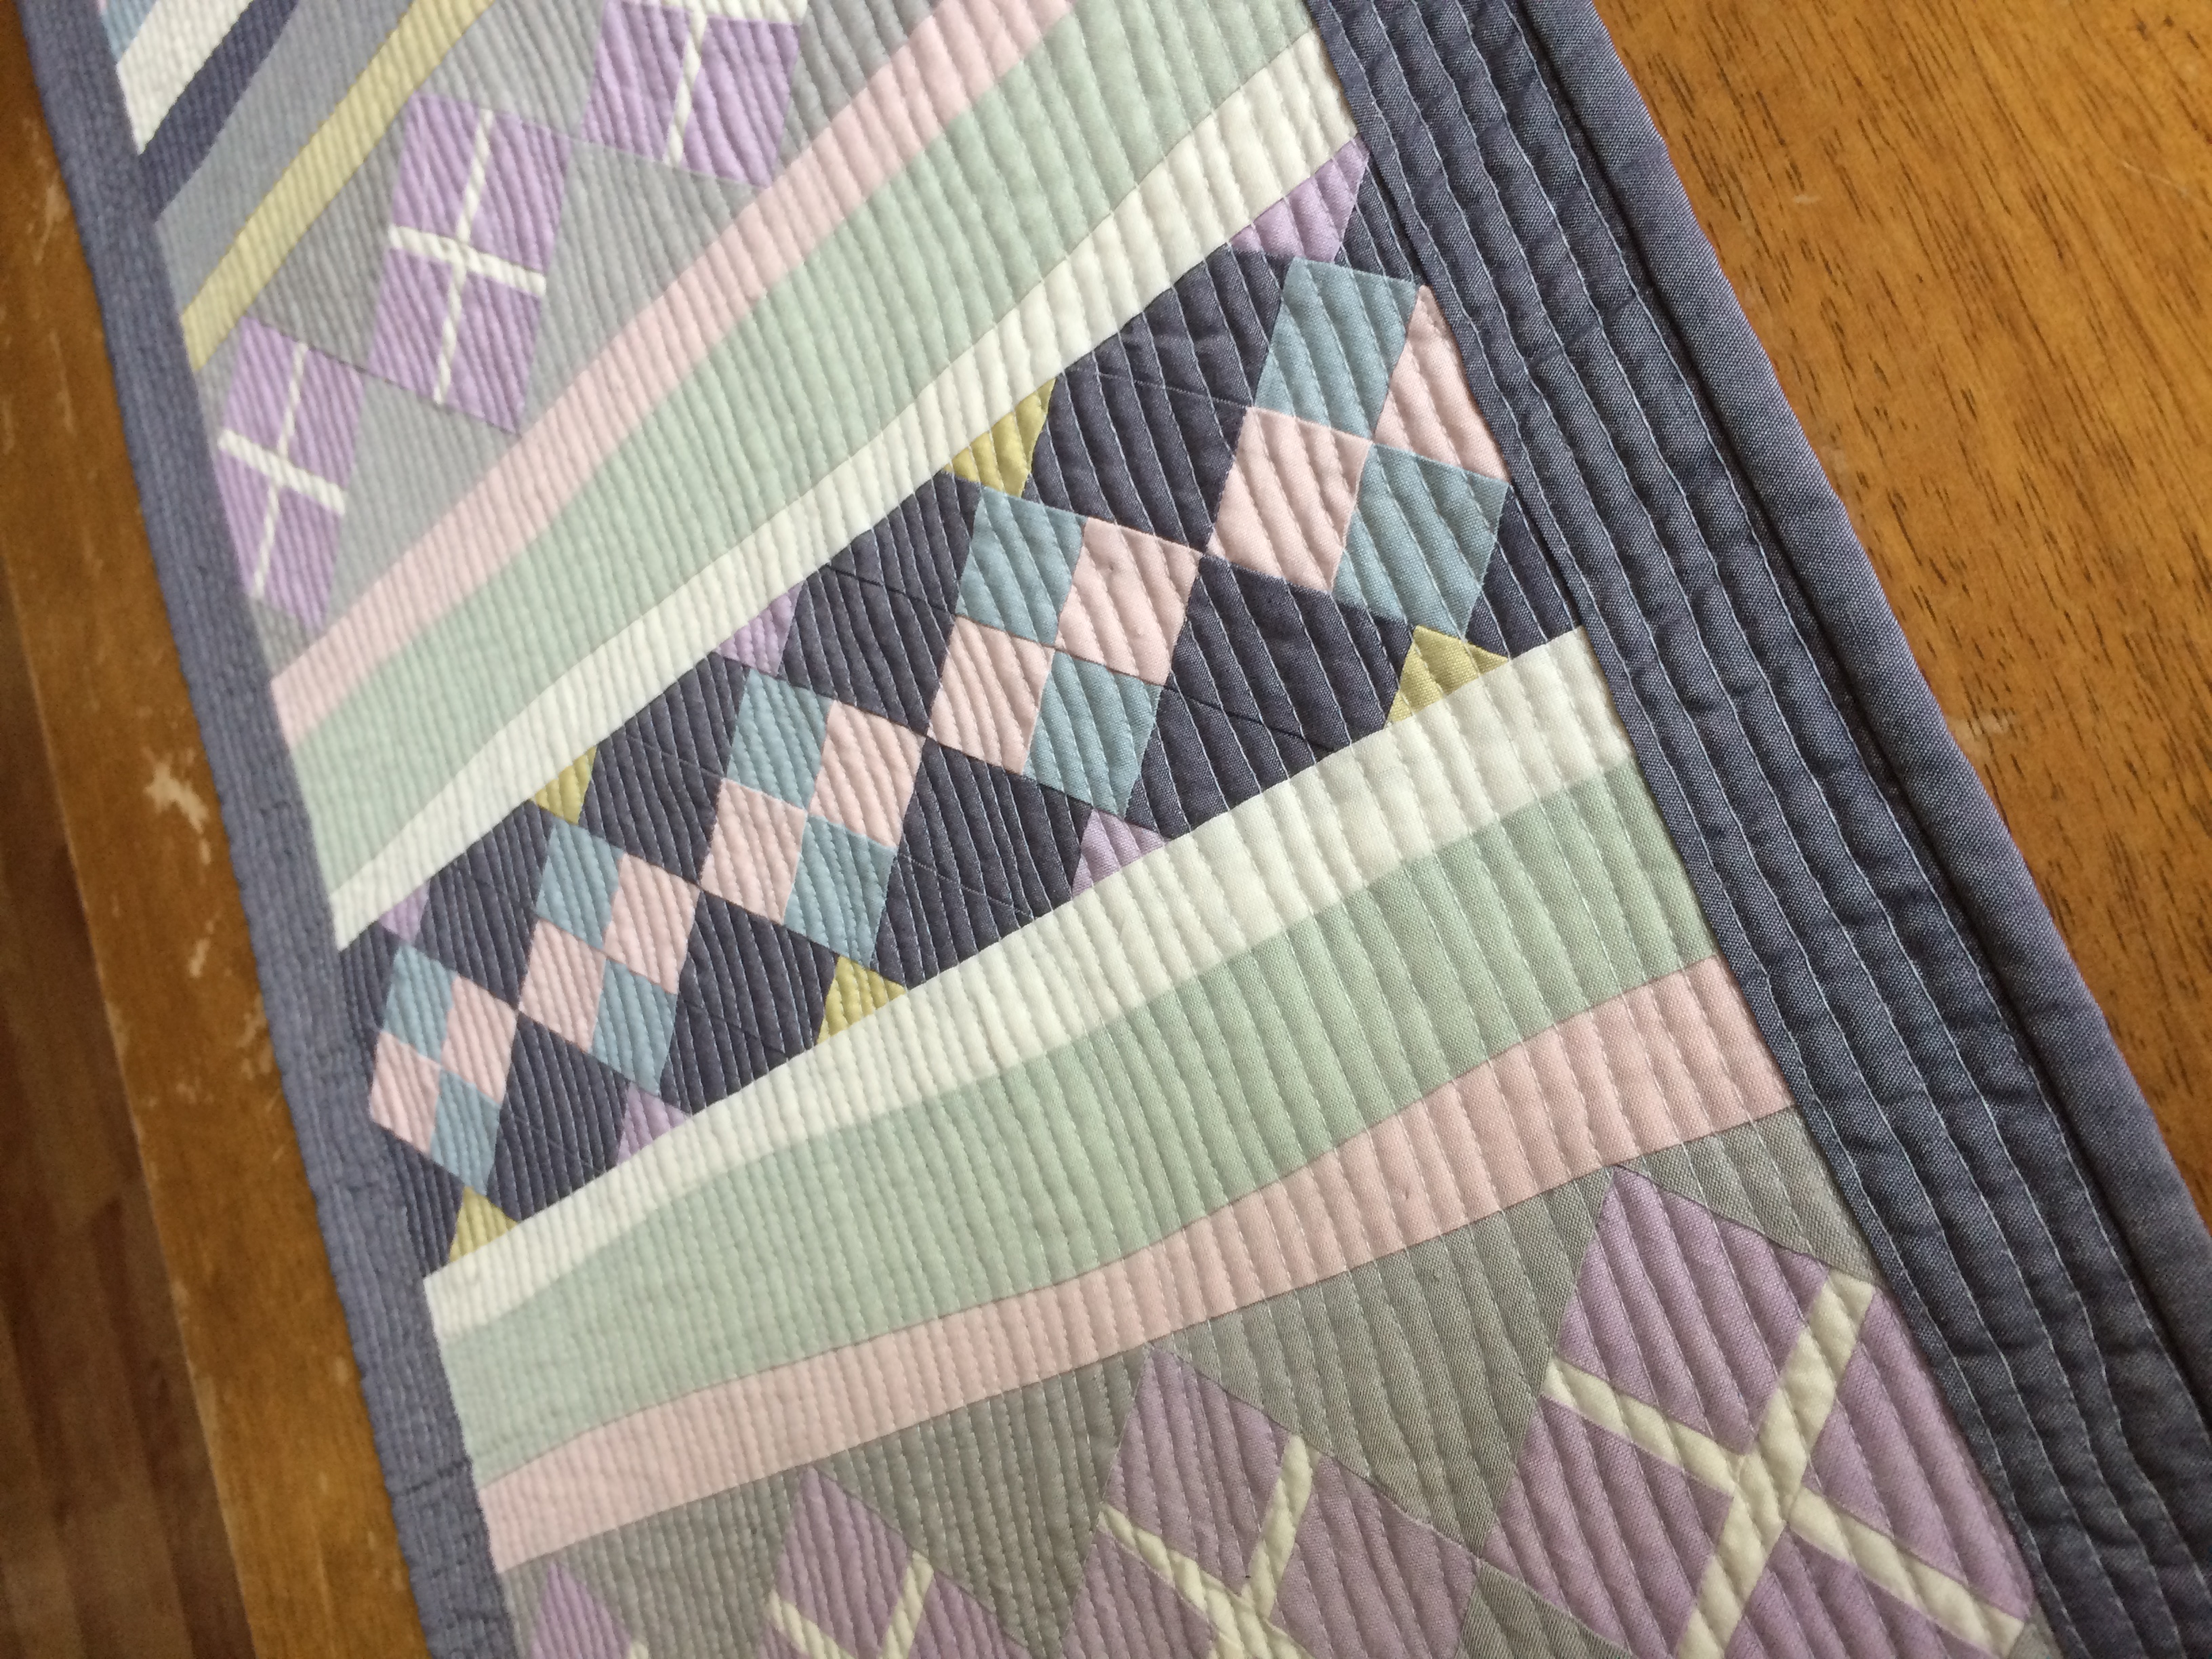
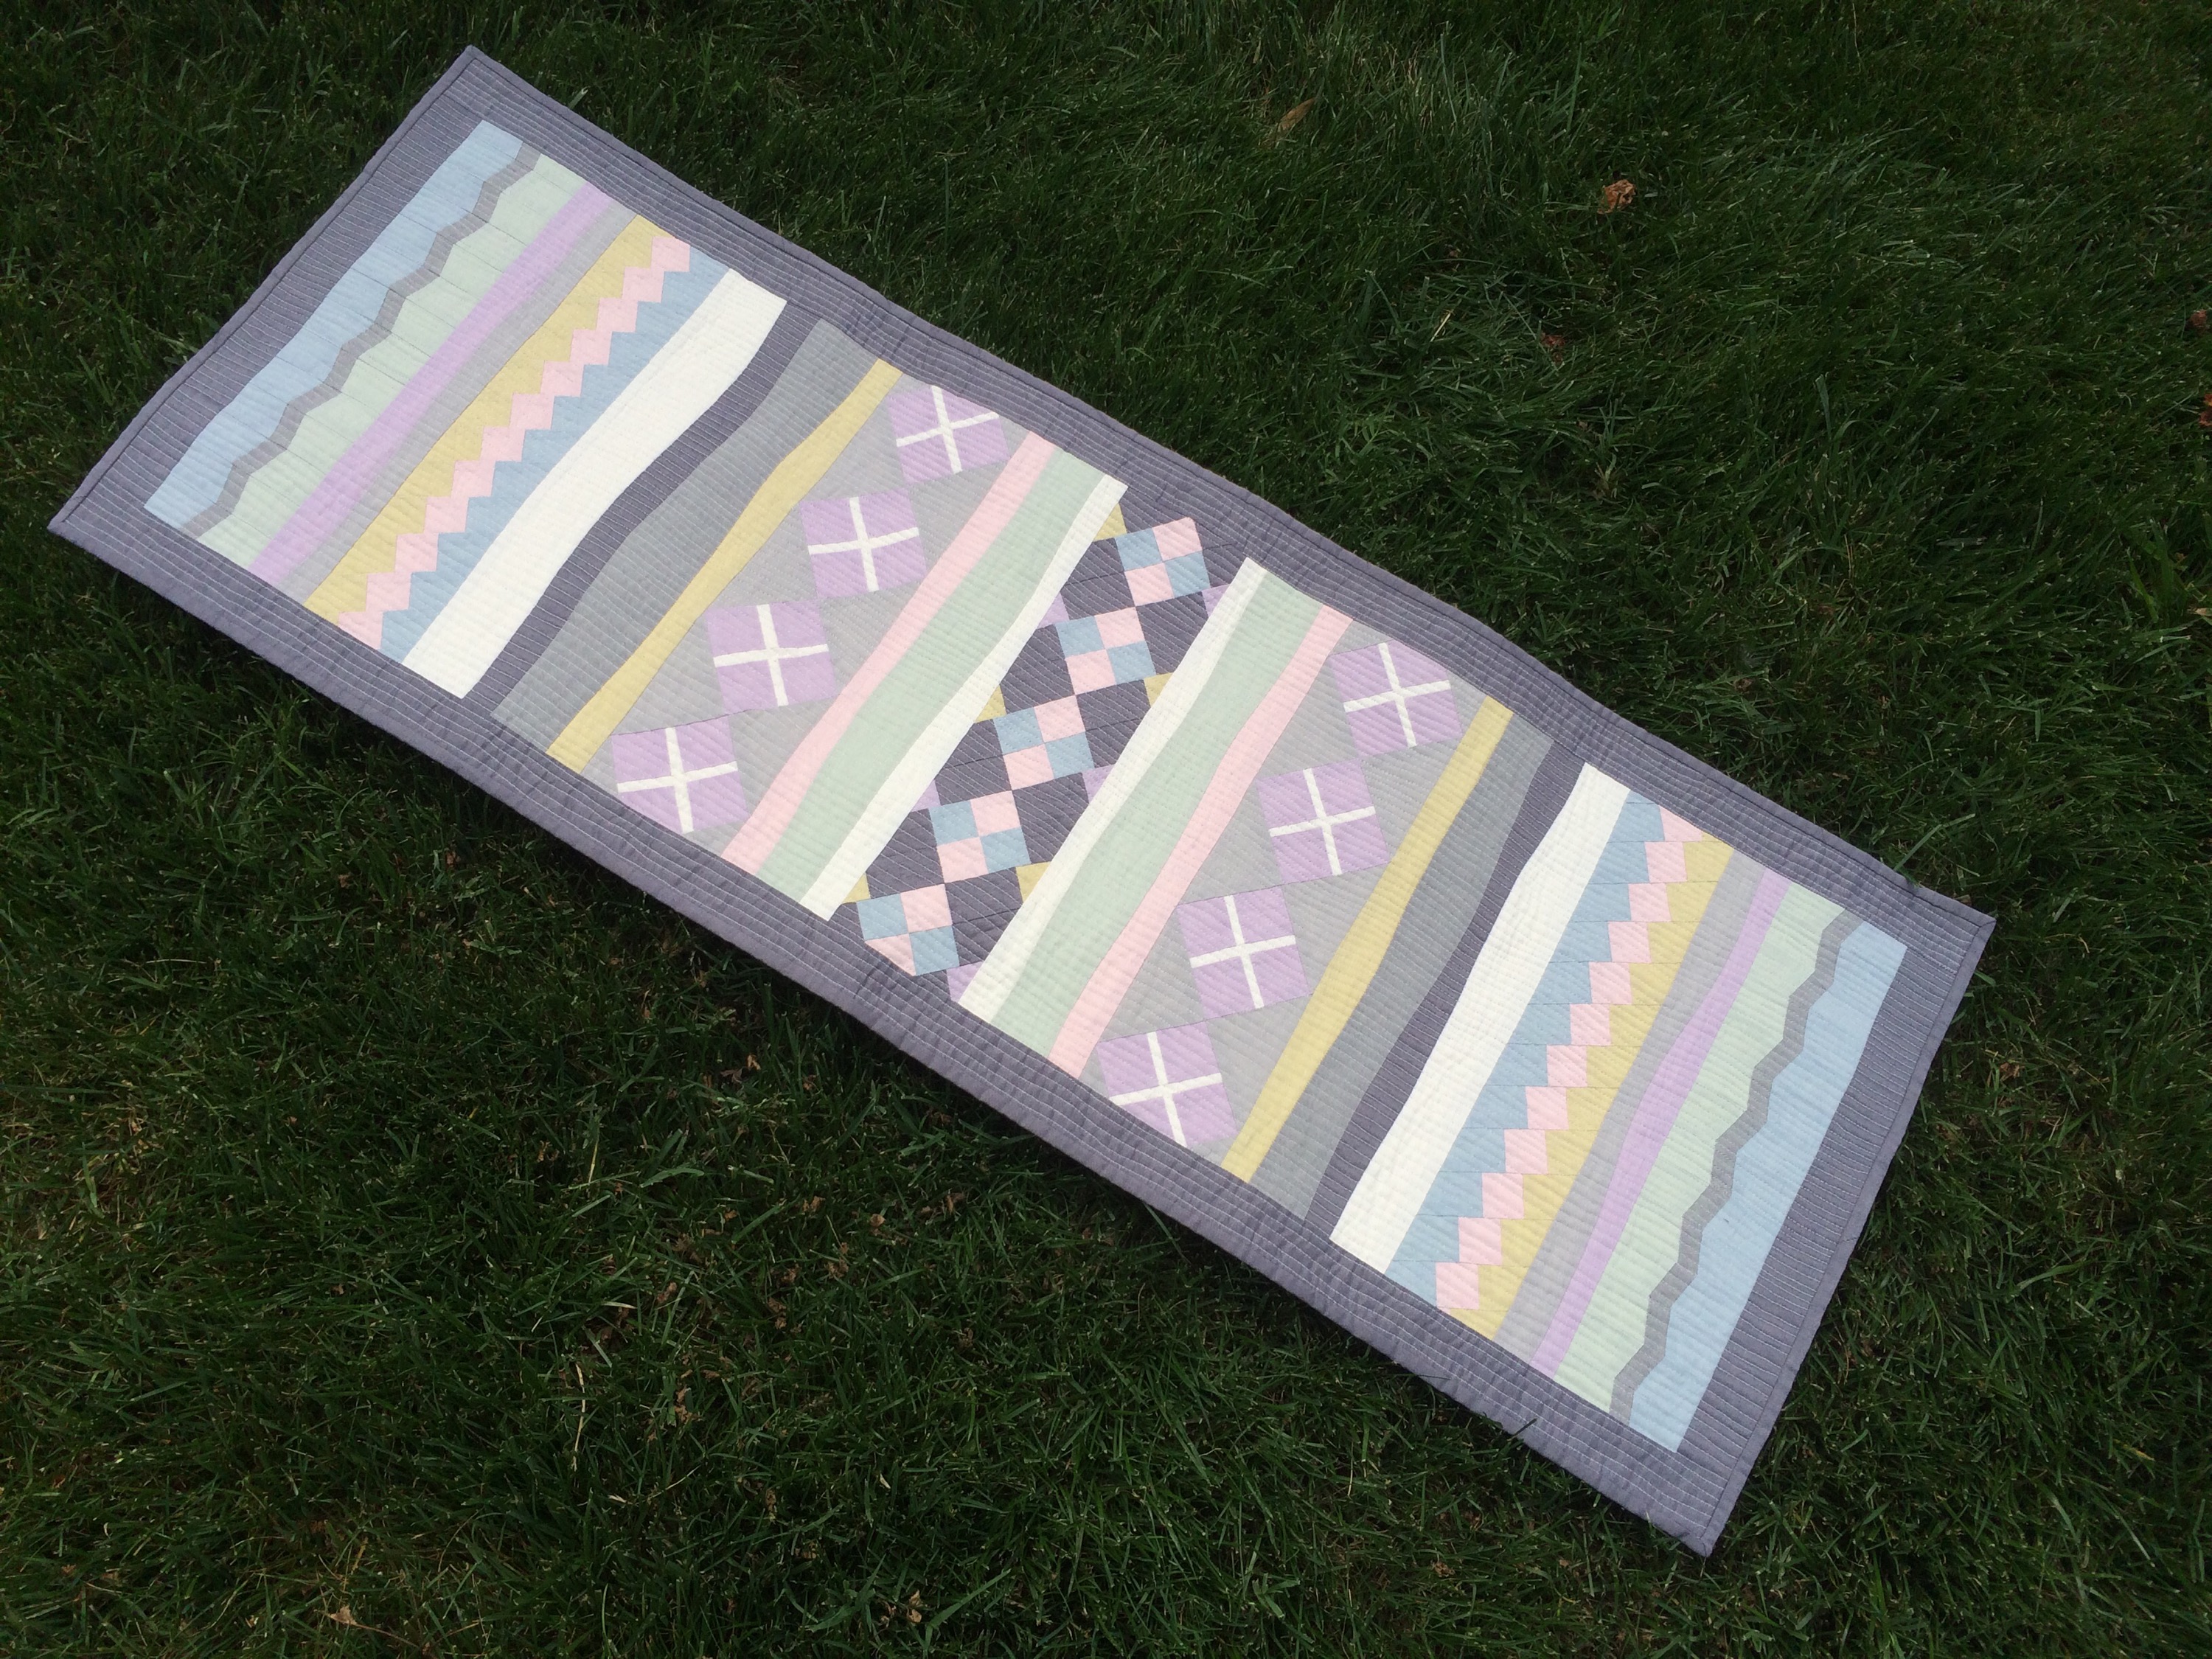
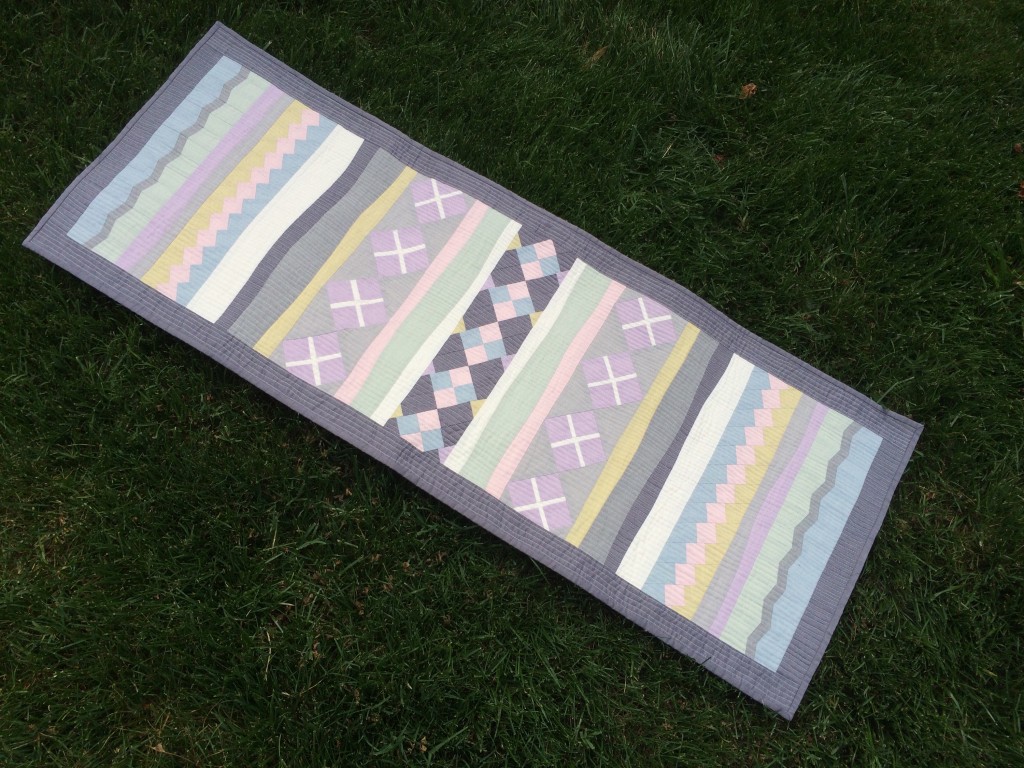
Modern Seminole Table Runner
Finished Size: approximately 15″x45″
Supplies needed:
- 1 collection of fat eighths of Oakshotts “Scandinavia” fabrics
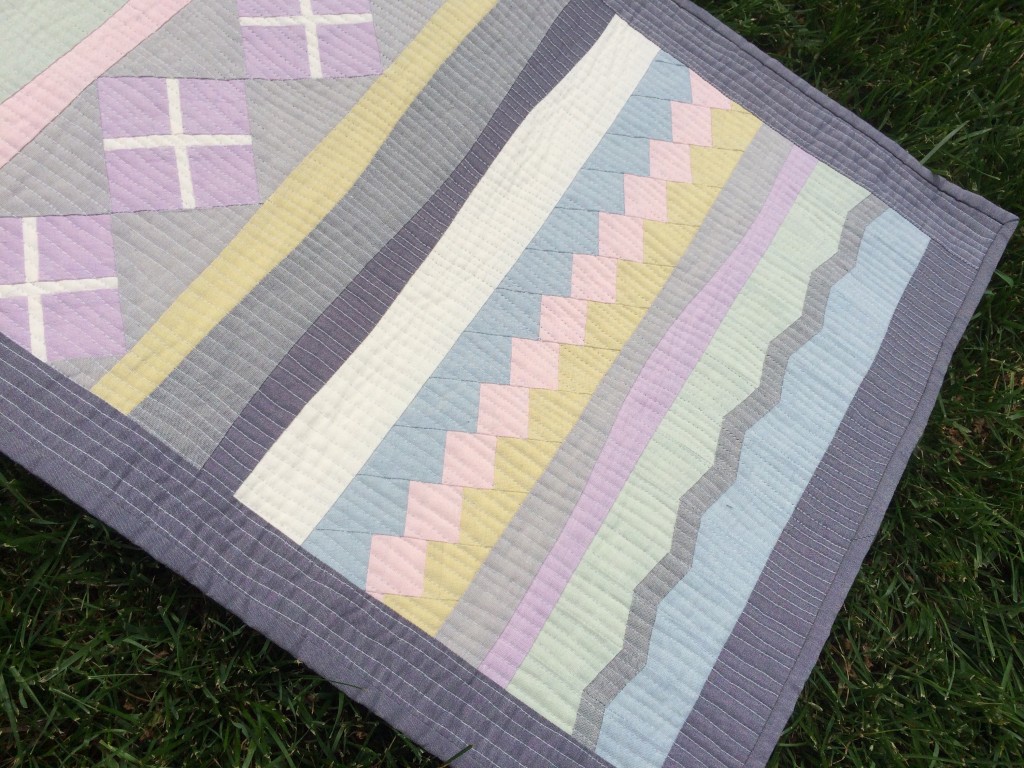
- 1 meter or yard of a contrast solid. I chose Oakshott’s “Vintage Silver,” because I felt that it played well with the others without being too terribly different, and it gave the pale fabrics a bit of visual weight that would be needed to pull off the Seminole concept.
For this tutorial, I created Seminole Patchwork designs based on my own measurements, but I have been very much inspired for over 2 decades by this amazing book: Basic Seminole Patchwork, by Cheryl Greider Bradkin. According to Amazon, I purchased this book in 1999 (after borrowing my mother’s copy repeatedly), and it has been sitting on my shelves as a reference volume, with pages marked and notations made, since. I didn’t refer to it until after I had decided and sketched out the designs I was going to do, but like anything that is practiced a lot, the early influences are very definitely there.
If you like what you see in this tutorial, I strongly recommend that you look into getting a copy of the above book. Her versions are more true to the precise Seminole piecework tradition, but I chose to modernize them a bit for my tutorial today by abandoning the straight seams in the connector strips, and I didn’t worry if the piecework itself wasn’t perfect. Not all of my 1/4″ strips in the Seminole designs are perfectly straight, and it turns out that it’s OK! I’ve always wondered if I could approach Seminole Piecework from a more relaxed standpoint, and this experiment has affirmed that I can — and it’s still effective! And the best part? It still LOOKS complex—–but isn’t. At all. Seriously — it’s just strip piecing, so it’s suitable for beginners, and it goes quickly. And, as I discovered this time, it’s forgiving of imprecision and the effect is still spectacular. Give it a try.

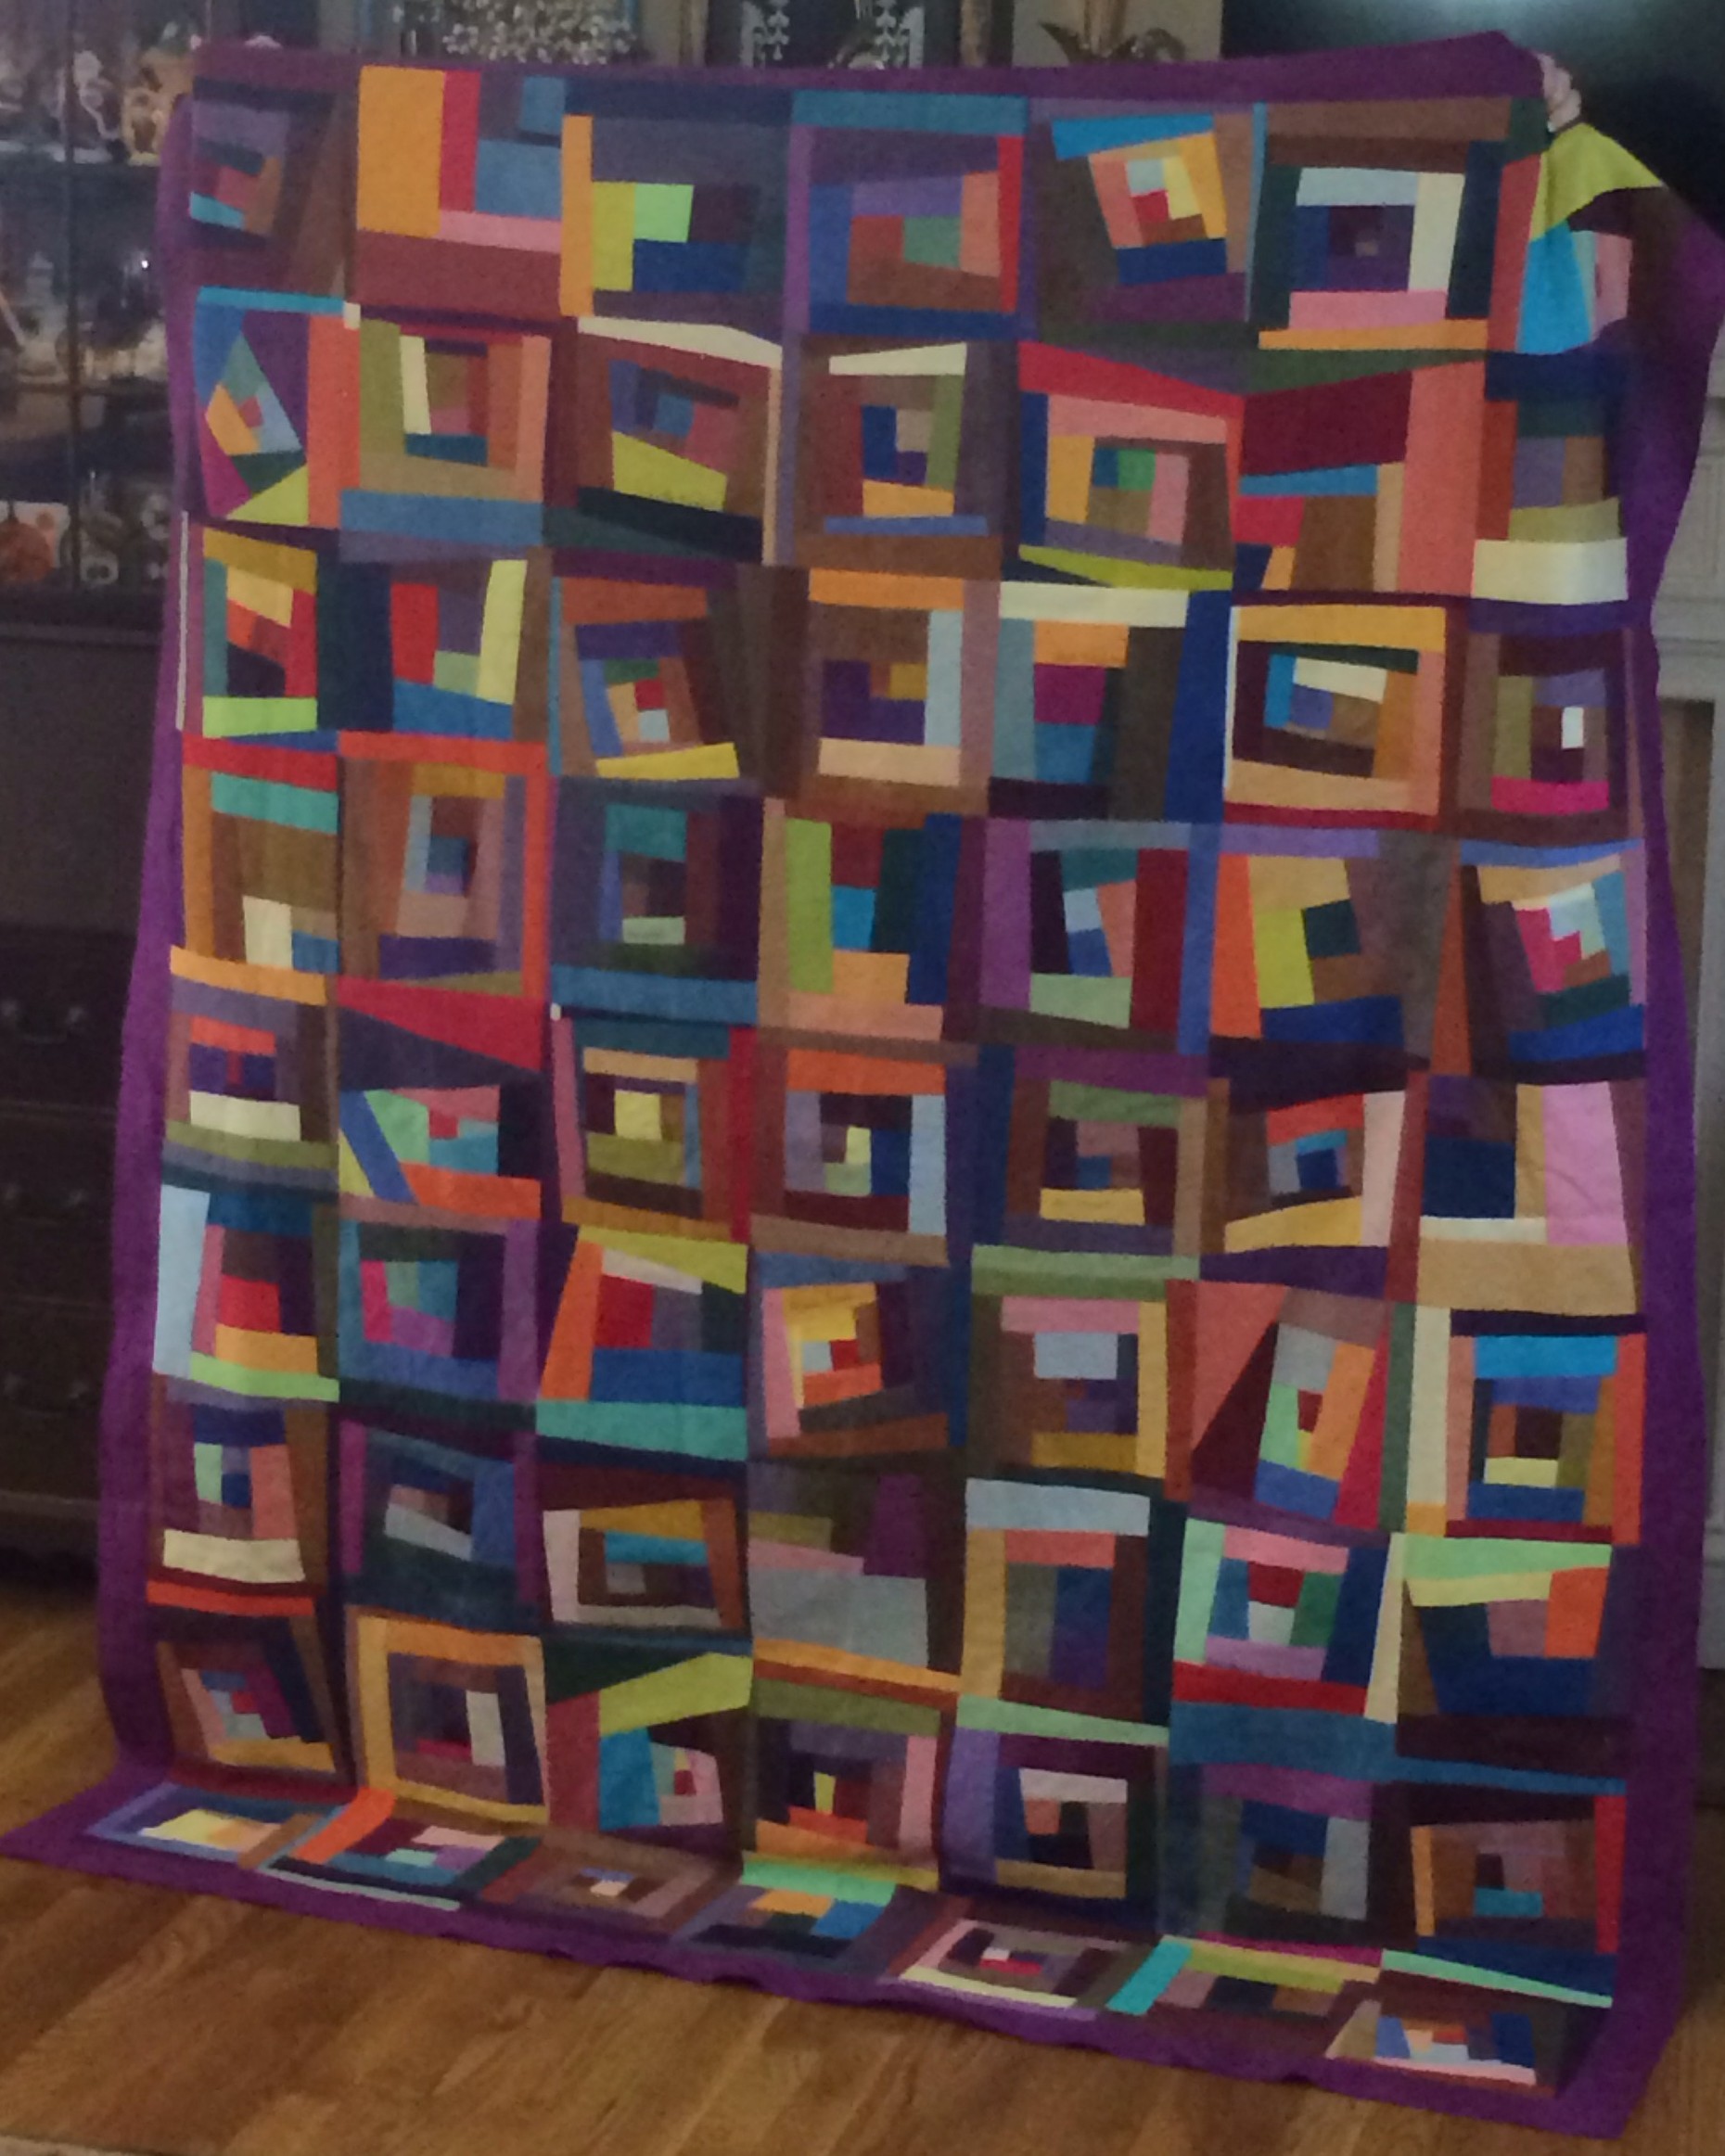
First, a little backstory… I grew up with my mom sewing lots of my clothes, and I caught the sewing bug early. Her mom sewed for her as well, and so I really was defenseless when it came to whether or not I’d end up sewing as well. In my first grade school picture, I wore a yellow dress with a green pinafore that had Seminole piecework on the bodice and skirt. I loved that dress and I remember being sad when I grew out of it (even though I had taken scissors to it in an example of a very poor life decision, but Mom had been able to rescue the damage I had done… I’m always humbled when I think back to that. Sorry, Mom!).
After that, Mom made me another dress, this time a sundress in cotton batiste pastels for a cousin’s wedding. I remember feeling like an Easter egg when I wore it — which was a VERY good thing for an eight-year-old girl. That dress we kept and my children have worn it, though I don’t have photos for some reason.
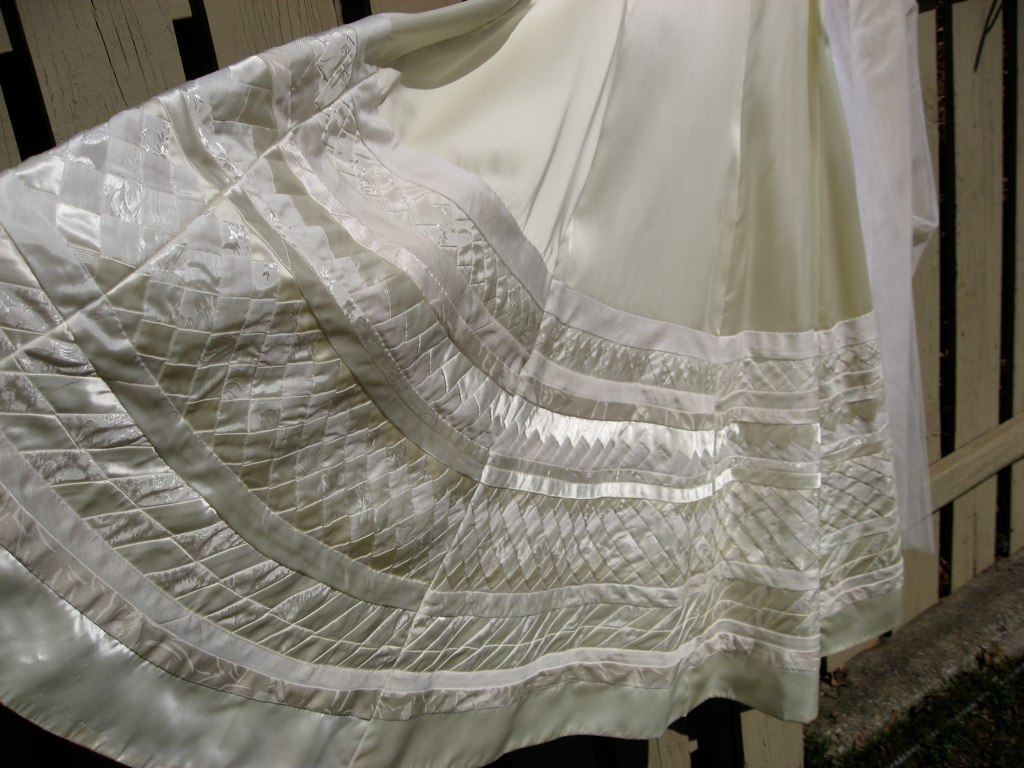
When I was 18, I was asked to participate in the Huntsville (Alabama) Symphony’s Debutante Ball, which essentially meant that I was to go to social events all summer, and the social season culminated in a fancy ball in October where the 29 girls were “presented” to society. In years past, this meant that the young ladies were ready for marriage, but now it’s just a fun excuse to get dressed up and learn some etiquette and dancing. Flying home from a family vacation early that summer, I drew a sketch of what I wanted my dress to look like, and Mom and I spent the summer making it. It’s Seminole piecework in bridal fabrics, and we modified a 1950’s wedding dress pattern to be a little more current so that I could wear it for the ball.
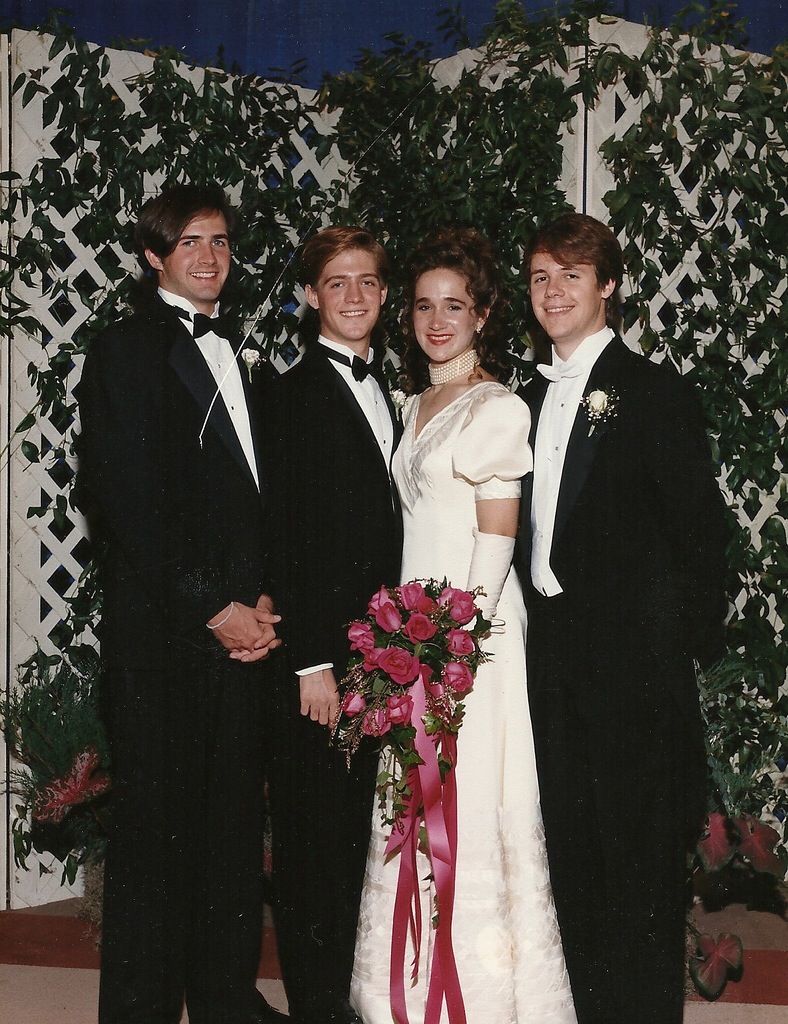
(This photo was taken at 12:30am after we had been dancing for 3 hours, which is why we were glistening so much!)
The dress flared into more than a full circle, which made it phenomenal for dancing. It also weighed over twenty pounds with all of the peau-de-soie and taffeta and stabilizers and linings that made it hang properly. But I loved that dress.
Five years later, I was engaged to my wonderful Jerry. Mom wanted to go shopping or make a new dress, but I wanted to wear THAT one again. So we made a bolero jacket and attached the train from my Mom’s 1964 Priscilla of Boston wedding gown, and it was transformed from a dancing dress into a wedding gown.

I’ve never been a big fan of ruffles, bows, laces, or sparkles, so this dress was perfect for me. It caught the light when I walked, and the weight of it (with a double petticoat underneath) meant that it had the formal structure that I’ve always loved in fairy tale gowns and it hid what I perceived to be my figure flaws at the time (HA! Ha ha ha ha HAAAAA!) My girls will both be so much taller than me that they won’t be able to wear it unless we take it apart, but that’s OK. I got to wear it twice — how many women can say that?
Fast forward a little bit… I made clothes for my own girls regularly when they were little, and I loved inserting bits of piecing into their dresses for interest. In 2008 when Helen (the oldest) was almost 6, she requested that their Easter dresses look like Easter Eggs. I was happy to oblige.

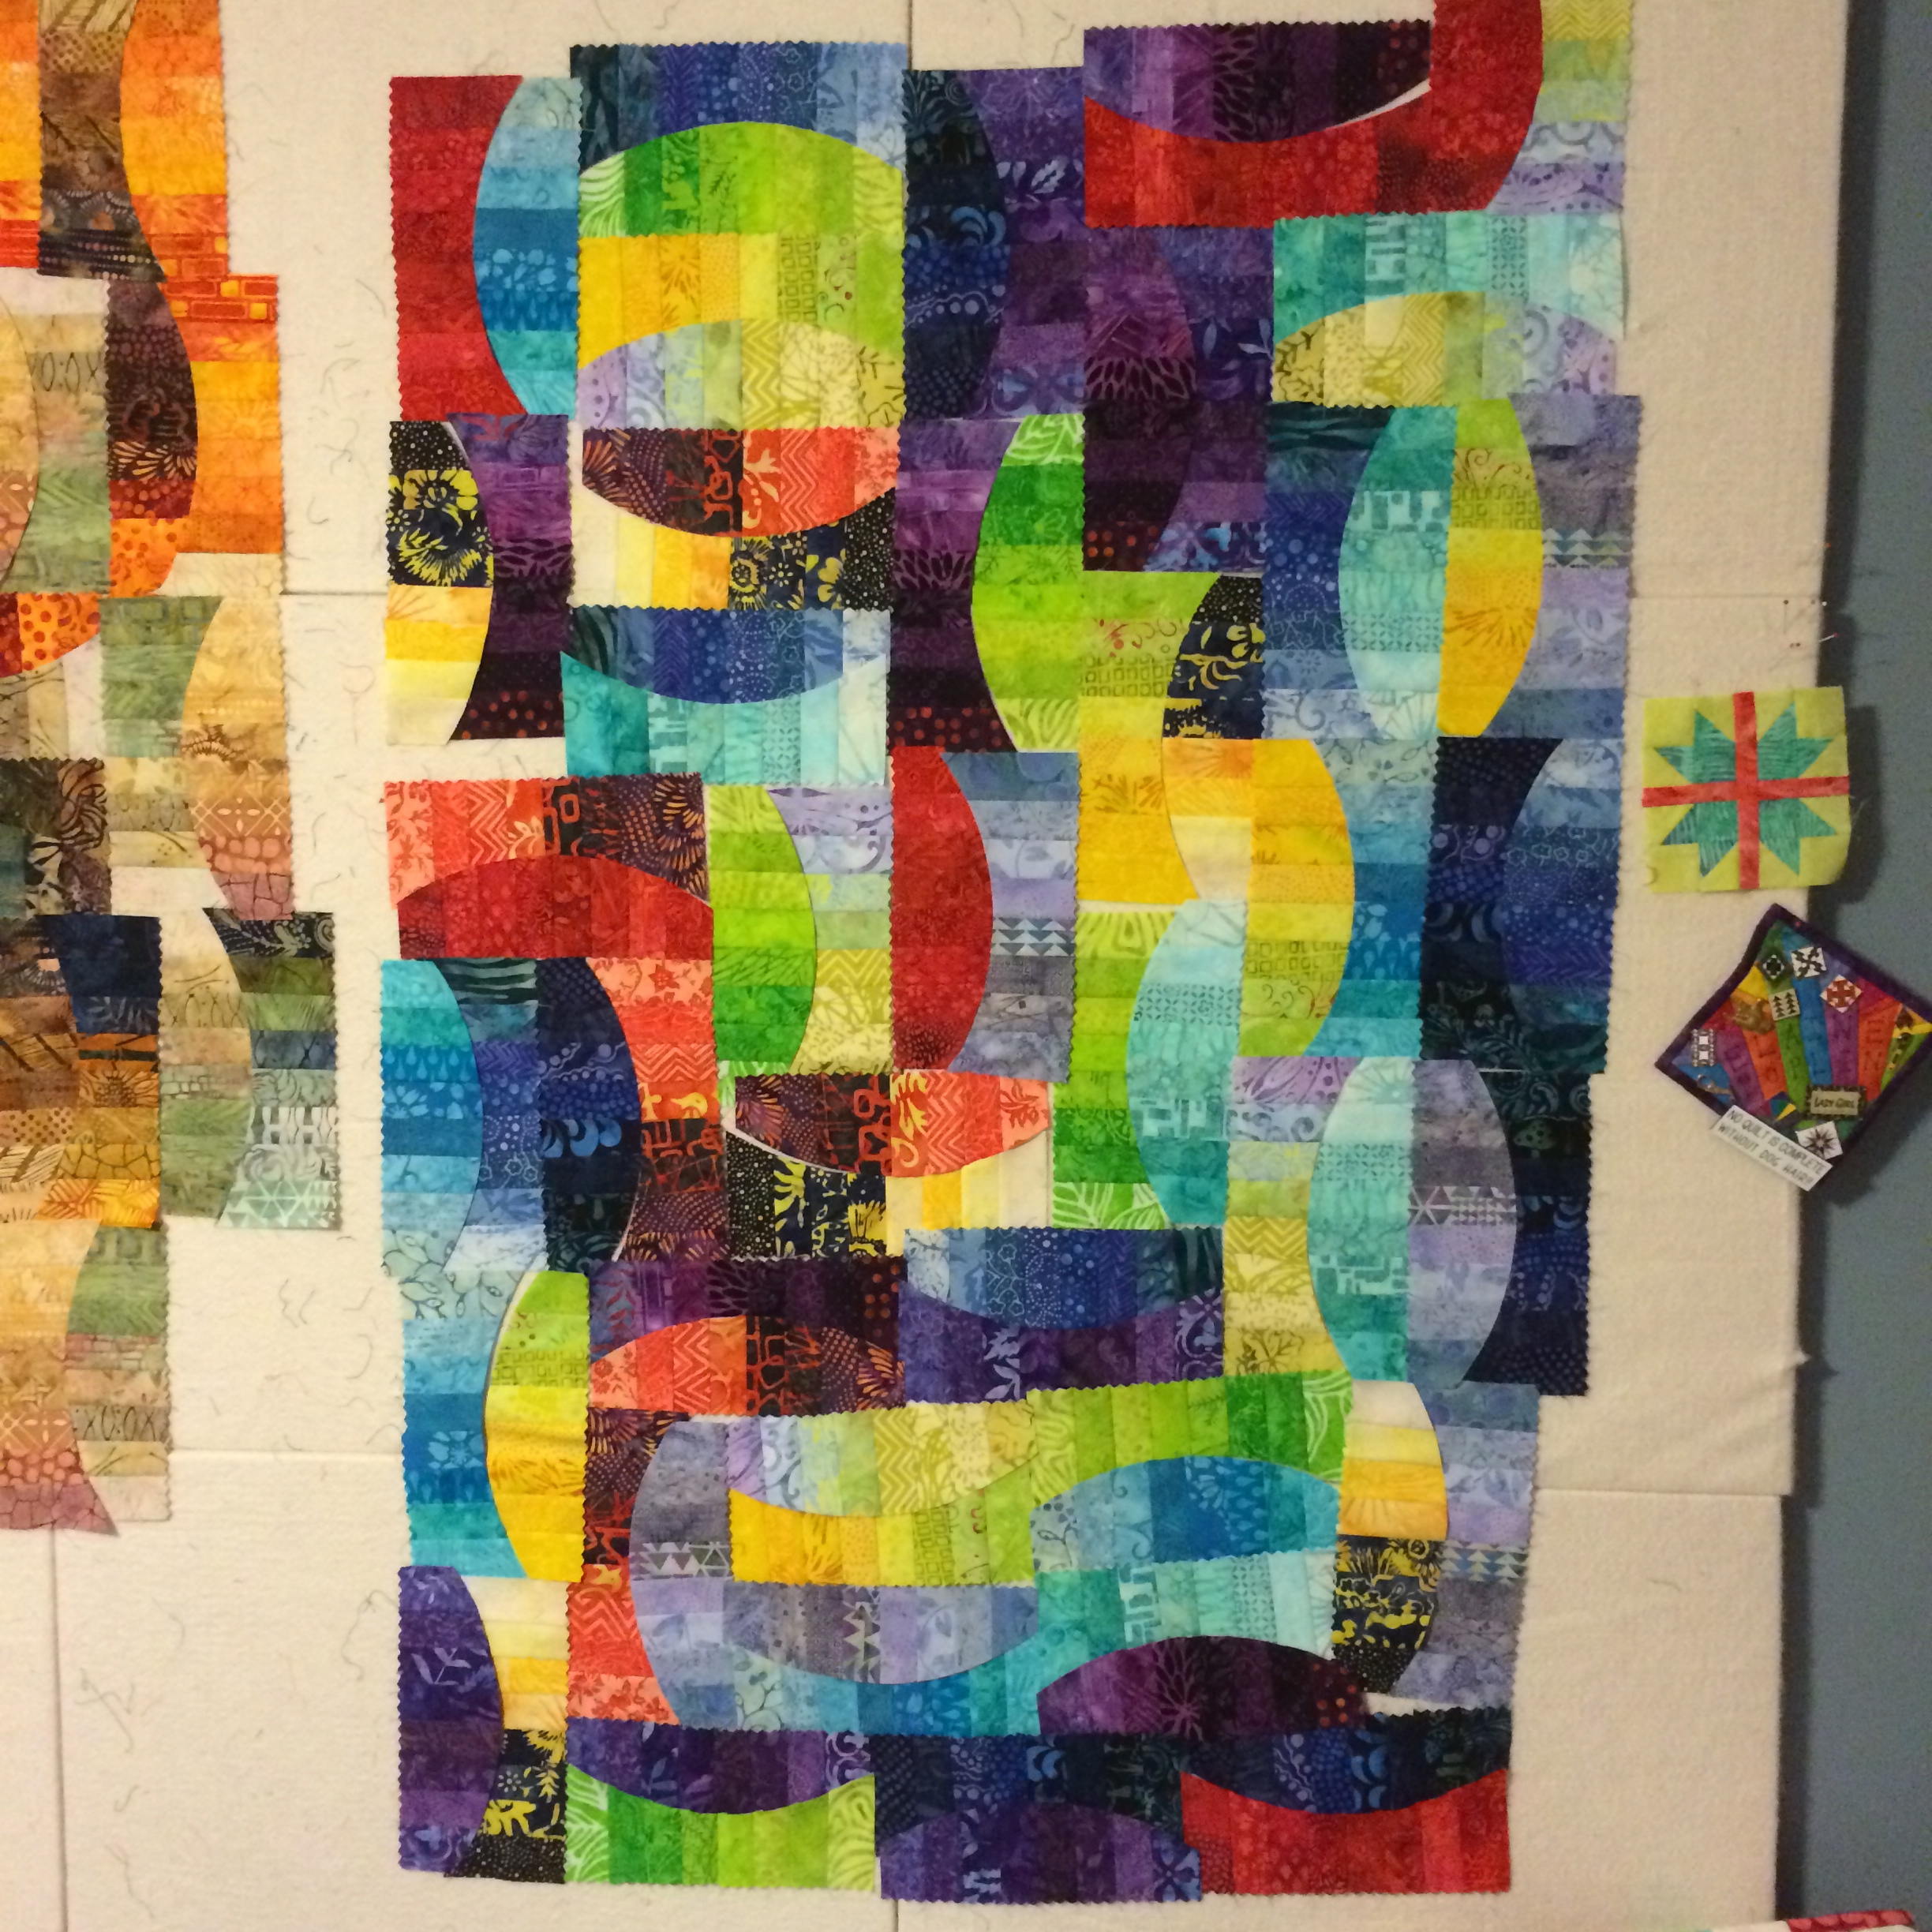
When I was asked to participate in this blog hop and saw the fabrics in person for the first time, I immediately decided that I was going to try something with Seminole piecework, because I had always loved the subtlety that the no-contrast fabrics had had in my wedding gown, and knew I’d enjoy having a delicate-looking table runner for Easter. But rather than create rigidly straight Seminole as I always have before, I thought it might be more fun to experiment with improvisational piecing also and see what happened when I combined the two.
So, without further ado, here’s the basic tutorial for Seminole Piecework. It’s all done with strip piecing, so it goes MUCH faster than it looks like it will. This tutorial is for one of the most basic 3-strip Seminole designs, but I’ve provided measurements and diagrams for the other pieced sections in my table runner at the end if you’re interested. All of my measurements are in inches, since that’s the measurement system we use here in the States. (As a mathematics teacher, it baffles me that we don’t use a base-10 measurement system, but whatever. Nobody asked my opinion.)
All strips are width-of-fabric, whatever that may be for you. I was using fat quarters of meters of fabrics, so it ended up being about 26″ wide of usable fabric. Start with one strip per color and make a section, and then cut more strips if you need more finished length. The beauty of this technique is that you can make a little, see how it goes, and make more if you need to. You definitely don’t have to cut all of it at once before you begin.
Note: I chose to draw my visual aids in Adobe Illustrator rather than with the Scandinavia fabrics, for the simple reason that my evening photos of the absolutely GORGEOUS Scandinavia fabrics were not coming out well. Turns out they are difficult to photograph in the late-at-night lighting that I have available to sew during the school year. So I do apologize for that, but I don’t apologize for the fact that I did not have to clean my #honestsewingroom to bring you this tutorial. Because then I undoubtedly would have been late, which sort of defeats the purpose of a Blog Hop. I digress.
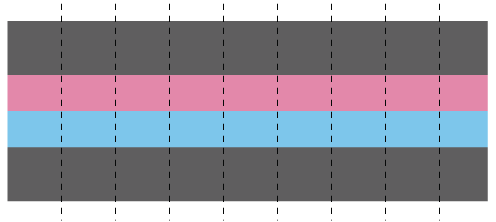
Tutorial for 3-Strip Straight Offset Strip (will finish 2-5/8″ wide):
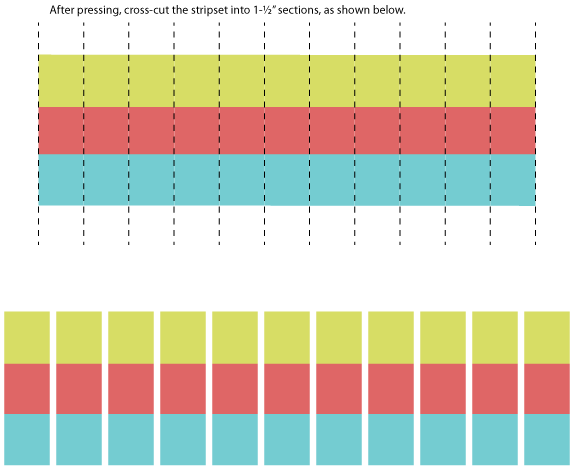
1. Cut three strips of fabric as shown:

2. Lower the stitch length on your sewing machine and sew the strips together. My machine’s default is 2.2 (whatever that means), so I lower the stitch length to 1.8. Because I’m going to be cross-cutting these strip sets, I want to have more stitches between cuts to keep the units from popping apart as I manipulate them.

3. Press each seam carefully with a hot, dry iron. SUPER IMPORTANT!! This will also help prevent you from having to use pins! (Why not steam? Steam will distort your fabric… Not a great idea when you’re going to be working with so much bias!)
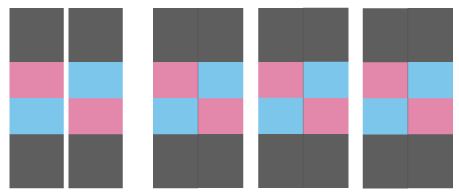
4. Cross-cut the strip sets evenly. These are cut perpendicular to the seams (i.e. “straight” as opposed to “diagonal”), but you can also cut at a slight angle for a more dramatic effect. Just be consistent with how you choose to cut! I cut mine 1-1/2″ wide.
5. Offset the pieces an equal amount (as shown below) and sew them together in pairs. Then offset and sew pairs of pairs together, then groups of 4, etc. until you have all of your units sewn together into one long unit.
Note: Initially, I tried cutting and sewing the strip units slightly wonky, and I cut the cross-cuts so they weren’t all the same width. What I found is that the effect was the same either way. Oddly enough, being “random” required a lot more concentration, so it was just easier for me to use a ruler and measure. Your mileage may vary, so it’s really up to you.

Note: I eyeballed the offset (rather than measuring), and did not pin units together as I worked.
6. Press each unit to one side or press seams open, whatever you like. Your finished strip unit should look like this:

Next, you’ll want to attach strips to the top and bottom edges to provide stability and contrast to set off the piecing.
7. Make straight cuts along the top edge, like so:


8. Attach 1-1/2″ wide (or more) contrast strips to the top and bottom edges:

In traditional Seminole piecing, all of the contrast strips between the pieced sections are straight strips, just in varying widths. Since I already know that works, I had to play with it. I still wanted varying widths, but I didn’t want them to be straight.
My contrast strips were cut at least 1-1/2″ wide so that I could have some breathing room to make slow curved cuts for my improvisational piecing. With pieces narrower than 1-1/2″ wide it’s difficult to have enough fabric to play with for the curves.
Gentle improvisational curves are actually really easy to do, and you don’t have to use pins! You just have to have a sharp blade in your rotary cutter and a willingness to experiment, the patience to sew slowly and carefully, and a functional relationship with your seam ripper in case of minor issues.
9. Decide which fabrics will be used on either side of your pieced unit, and arrange them as shown, right sides up.

Layer the strips so that the newest pieces are on the bottom and the sewn unit overlaps on the top, and all pieces are right sides up, as shown below. Eyeball or sketch a gentle curve that is entirely within the overlapping section, and slowly and gently cut the curve with your rotary cutter.
Note: I only do one curved cut and seam at a time to avoid stretching the fabrics, rather than multiple cuts. I’ve shown two cuts in the diagrams below just in the interest of space, but I definitely recommend taking your time and making these cuts and subsequent seams one at a time.

You will end up with pieces that nest perfectly together, like this:

You will also have some little leftover shards of scraps that you can discard or save for another purpose (if they’re large enough):

10. Flip the outside fabric over so that the sections are right sides together, making sure that the left cut ends are still lined up.
Pinch the “start” of the seam between your fingers, and go to the sewing machine. Your pieces will look kind of weird, like they won’t fit together after all and you’ve made a terrible mistake and perhaps you should just give up and go have a hot bath. You haven’t messed up, though. I promise. Just trust me. Pinch and go sew!

11. Sew slowly and carefully, with a NARROW seam allowance (mine is usually between 1/8″ and 1/4″, depending on how tight of a curve I’m trying to manipulate), adjusting and easing gently with your fingertips or a stylus so that the edges of the top fabric are lined up with the edges of the bottom fabric as you go. Stopping and starting is fine, as long as your fabric is stable under the machine foot. When I first started playing with improv curved piecing, I found it helpful to use my sewing machine in the “needle-down” setting and sew at a turtle pace, but I have found that over time I have gotten much better at it. And when I inevitably mess up, I gently pick out the stupid error with my seam ripper and try again.
When you finish the seam, it’s going to look puckery and weird and like it won’t lie flat. That’s OK.
12. Press with starch or a starch alternative until it submits, and you’ll have a beautifully curved pieced unit. Again, I don’t recommend steam for the simple reason that it may distort your fabric and then the finished piece won’t lie flat. Benefit from my experience here. Seriously. Don’t make me come over there and take your iron away. You’ll thank me later. No steam. I mean it.
After both sections have been attached, it’ll look like this!

Ta da!
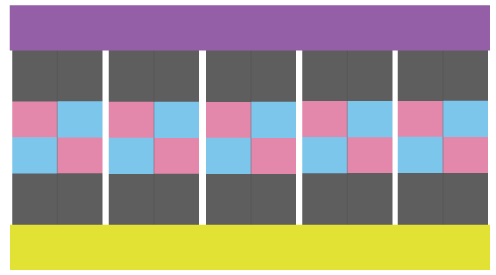
13. Keep attaching more curvy solid strips or pieced units, and in a very short period of time you’ll have enough to square off and complete a table runner like I did! Seriously, it took me longer to quilt it than it took to make it. I added 2.5″ of Vintage Silver around the edges and quilted organic lines in Aurifil #2600 (Dove) while watching 3 episodes of “House, M.D.” Straight line quilting is really dull to do. Wobbly-line quilting is only marginally less dull.
And if you want to make something similar to mine, here are the basic measurements that I used in the other three different pieced sections of my table runner. I’ve named the sections so that the specialized instructions for each are easy to find. The “3-Strip Straight Offset” instructions are in the tutorial above, as it is the simplest of the four.
 
Chevron Stripsets (will finish 3″ wide):
1. Make 2 stripsets per pieced section: 1-3/4″ blue, 1″ gray, 1-3/4″ green.
2. Press all of the seams of one stripset towards the blue and press the seams of the other stripset towards the green.
3. Place two stripsets right-sides-together, nesting seams, lined up on one of the lines on your cutting table and trim the left end straight across.

4. Make a mark 1″ in from the left edge on the bottom. Line up this mark with the top left corner of the stripset, and use a rotary cutter to cut the stripset diagonally. Discard the corner triangle scraps.

5. Make another cut 1-1/2″ from that diagonal, and be careful not to disrupt the cross-cut chevron pairs.

6. Continue cutting 1-1/2″ units, keeping chevron pairs together.
7. Sew the chevron pairs together and press seams open or to one side, as desired.

8. Sew pairs of pairs, then groups of four, etc. until the pieced chevron units are complete.
9. Continue with step 7 of the 3-Strip Straight Offset Tutorial above.
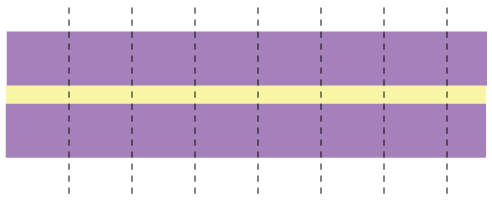
Criss-Cross StripSets (will finish 3-3/4″ wide):
1. Make 1 stripset per pieced section: 1-3/4″ lavender, 3/4″ cream, 1-3/4″ lavender.
2. Press seams away from the narrow strip and cross-cut into 1-3/4″ sections.
3. Divide the cut units into two stacks and set one of those stacks aside.
4. Cut 2 more 3/4″ strips of cream
5. To the right edge of one stack of lavender/cream/lavender units, attach another 3/4″ cream strip and press away from the narrow strip.

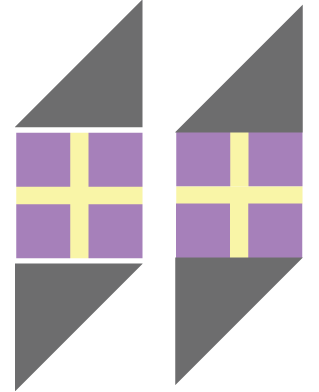
6. Sew the remaining purple-cream-purple sections to the units, matching up seams to make a “+” unit. Press away from the narrow strip. Trim to 3-1/4″ square.

7. Cut 2 5″ strips of gray fabric, and cross-cut into 5″ squares.
8. Cut the 5″ gray squares corner to corner in both directions, making 4 triangles each.

9. Sew gray triangles to the top and bottom of a “+” unit, as shown. Press towards the gray.
10. Sew pieced units together to make a long strip.


11. Continue with step 7 of the 3-Strip Straight Offset Tutorial above.
4-Patch StripSets (will finish 2-3/4″ wide):
1. Make 1 stripset per pieced section: 1-3/4″ gray, 1-1/2″ blue, 1-1/2″ pink, 1-3/4″ gray.
2. Press seams all in one direction and cross-cut into 1-1/2″ sections.
3. Rotate every other section so that a blue/pink 4-patch is created and sew pairs together. Seams should nest. Press seams towards one side or open, as preferred.
4. Cut one 1-1/2″ strip yellow, cut one 1-1/2″ strip purple (This was only necessary because I messed up my original calculations, but hey! Mistakes are just opportunities for rapid design decisions, right? Riiiiiight.)
5. Chain piece one short side of each unit to the yellow strip and the other short side to the purple strip. Press towards the new strips. Cut apart and trim.

6. Rotate every other unit (if desired), and then offset and sew units together so that the 4-patches are corner-to-corner, creating a long strip.

7. Continue with step 7 of the 3-Strip Straight Offset Tutorial above.
If you’re still with me, your diploma will arrive shortly. I’d love to see what you come up with when you play with these ideas! The design possibilities are endless, as you can see, and it’s a very quick and gratifying technique. The tutorial took longer than the project, by a lot!
Have fun, and please share your finished projects! I can’t wait to see!